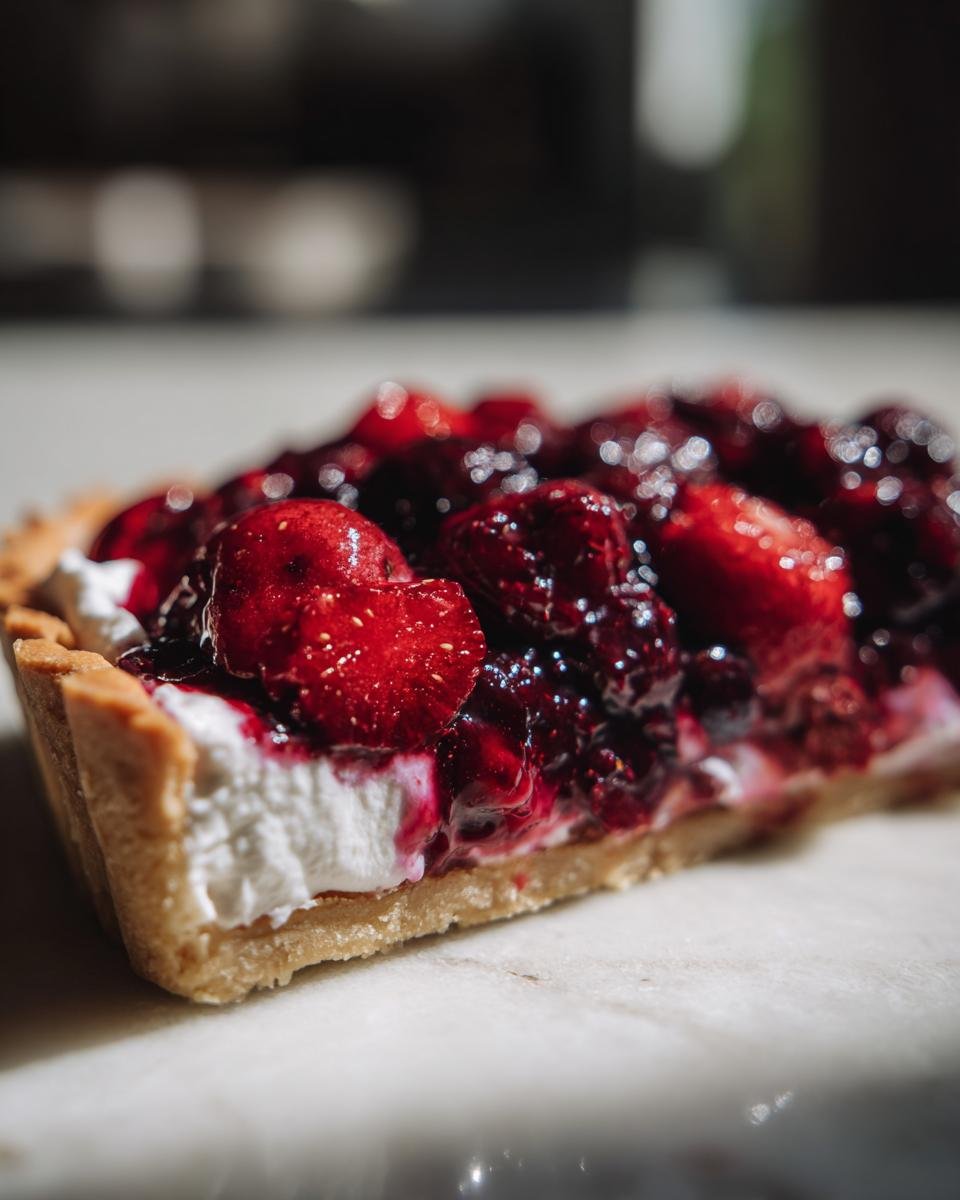
You know those desserts that look like they took all day, that you’d be nervous to serve at a fancy brunch, but they are secretly ridiculously easy? Well, this Roasted Berries Tart is my absolute favorite shortcut to elegance! I remember the first time I made this—I was scrambling for a last-minute dessert when friends dropped by, and honestly, I just grabbed a pre-made crust and tossed everything on a sheet pan. Wow. Roasting the berries concentrates their sweetness so much, and when you pair that jammy, warm fruit with a crisp shell and cool cream? It’s just magic.
This tart proves you don’t need complicated pastry techniques to achieve perfection. It’s sweet, it’s tart, it’s cool, it’s warm—it hits every note you want in a stunning, simple summer treat!
Why This Roasted Berries Tart Recipe Stands Out
I truly believe this Roasted Berries Tart is one of those recipes you’ll make again and again when you need a gorgeous dessert in a pinch. It takes all the flavor complexity and just skips all the fussy steps you usually associate with tarts. Trust me, friends, this one earns its keep on busy weeknights when you still want something special.
- It’s lightning fast—you’ll have the whole thing assembled and in the oven before you can decide on a movie to watch.
- You only need about five core ingredients for the filling, most of which you probably already have tucked away.
- The presentation is amazing! Roasting brings out such a deep, jewel-toned color that looks incredibly sophisticated. If you want another incredibly quick dessert option, check out my thoughts on this simple mascarpone and strawberry tart too!
Quick Prep Time for Your Roasted Berries Tart
Seriously, 10 minutes. That’s it for the prep work! You just toss the berries with sugar, juice, and cornstarch, and they’re ready for the oven. Because we are using a pre-made crust, we skip hours of chilling and rolling dough. It’s perfect when you realize company is showing up sooner than expected, I promise.
Minimal Ingredients for Maximum Flavor
I just love recipes where the ingredients list is short but every single item plays a huge role. We aren’t relying on tons of extracts or weird additions here. It’s just berries, a little sugar to coax out the juice, a touch of lemon for brightness, and that cornstarch to get that perfect, thick simmer in the oven. Simple things, done right, are often the best!
Gathering Ingredients for Your Roasted Berries Tart
When you’re working with a recipe this streamlined, the quality of your ingredients really sings through, so let’s talk about what you need to grab before you start roasting. Since we aren’t cooking anything for hours on end, we rely on a few sturdy players to carry the day. Even using a store-bought shell gives us such a leg up! I like to keep all my components right next to the stove before I even preheat the oven, so assembly is totally seamless.
We’ve got three key areas to cover: the fruit getting roasted, the fluffy cream topping we make at the end, and, of course, the foundation that holds it all together.
Ingredients for the Roasted Berries Tart Filling
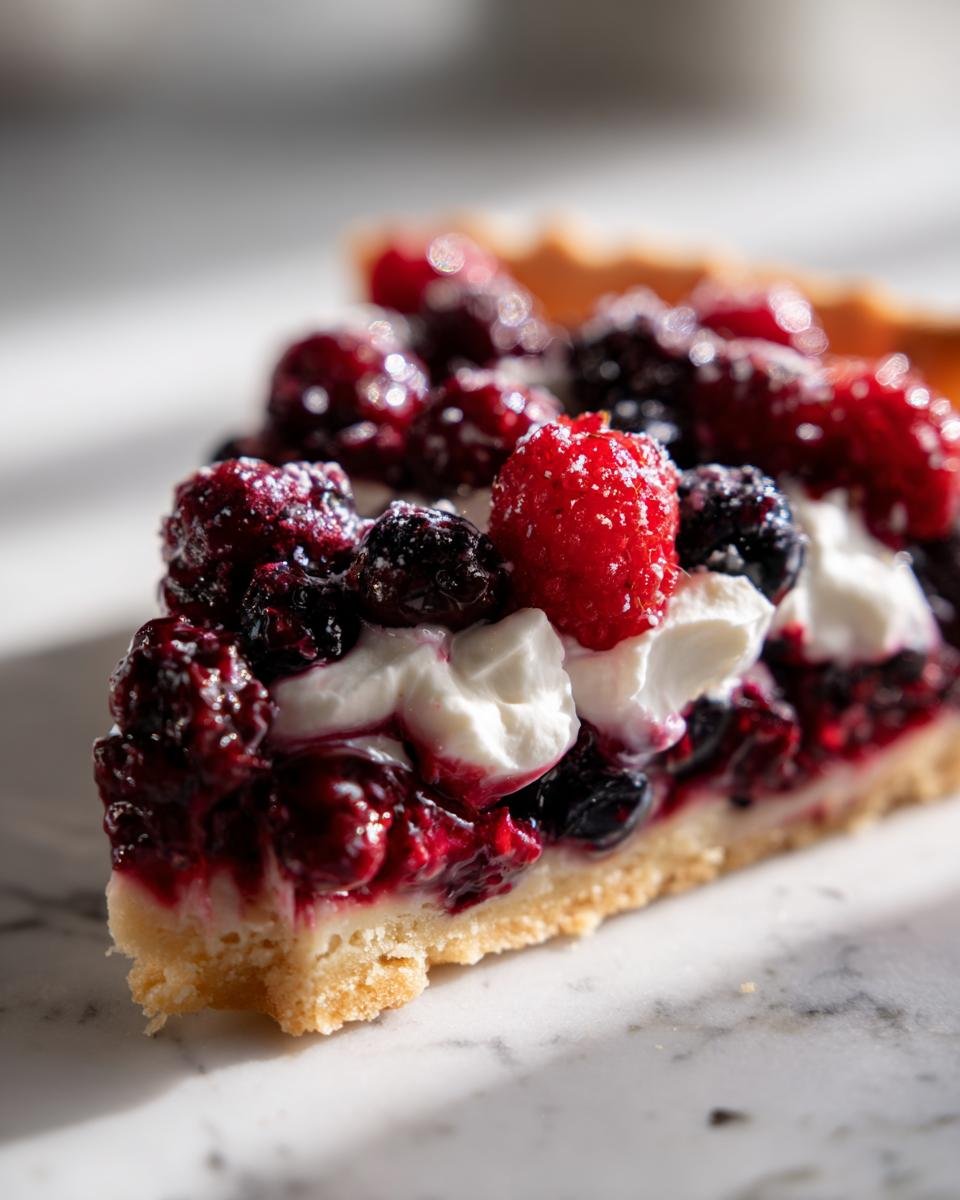
For that gooey, delicious center, you’ll want exactly two cups worth of mixed berries. I usually use whatever looks best at the market, but strawberries, blueberries, and even raspberries work beautifully together in the oven. You only need two tablespoons of plain granulated sugar—just enough to help draw out that gorgeous juice during roasting—along with a full tablespoon of fresh lemon juice for a little zing! Don’t forget the one teaspoon of cornstarch; that’s our secret thickener to make sure the juices don’t just run everywhere when you cut a slice.
Components for the Cream Topping
This part is so simple, it feels like cheating! We are just whipping up heavy cream—and I mean really cold heavy cream, straight from the back of the fridge—with just one tablespoon of powdered sugar. That’s it! When this heavy cream becomes those lovely, soft peaks, it’s the perfect cool blanket for the warm berries underneath. If you try to whip it warm, forget about it; you’ll just end up with sweet soup!
The Crust Requirement
Okay, this is where we save approximately two hours of work, and I am not ashamed! You’ll need one standard, ready-to-go 9-inch shortcrust pastry shell. Honestly, most grocery stores have great ones in the freezer section now. Look for one that is already blind-baked or ready to fill, depending on the package directions, but for this recipe, we just pop the berries right in and bake them together for that 15 minutes.
Step-by-Step Instructions for the Roasted Berries Tart
Now that we have our beautiful components ready, it’s time to put this masterpiece together! I know you might be tempted to skip the roasting part because you’re in such a hurry, but trust me on this one. Cooking the berries just a little bit deepens their flavor and makes them release exactly the right amount of juice to mix beautifully with that cornstarch. It’s worth the fifteen minutes in the oven, even if you’re making my famous lemon cream cheese bars later in the week!
Prepping and Roasting the Berries for the Roasted Berries Tart
First things first, crank that oven up to 375 degrees Fahrenheit—that’s about 190 Celsius for my international friends. Grab a small baking dish, toss in all two cups of your mixed berries, and sprinkle them with that granulated sugar, lemon juice, and cornstarch. Make sure everything gets a good little tumble around! Now, pop them into the hot oven for exactly 15 minutes. For the best roasting results, ensure the berries are spread in a single layer in the baking dish; this lets them steam and soften instead of just stewing in one big pile.
Assembling the Roasted Berries Tart Shell
Once that 15 minutes is up, pull them out! They should look slightly softened and gorgeous, with juice starting to bubble up around the edges. This is important: let them cool down for a good ten minutes. Once they aren’t scorching hot anymore, gently spoon all those juicy, roasted berries right into your waiting, pre-made shortcrust pastry shell. Try to keep the juice level nice and even across the crust!

Preparing the Whipped Cream Topping
While the berries are cooling down a bit, we can work on the cool topping. Get a clean, cold bowl and toss in your heavy cream and the powdered sugar. Now, get that mixer buzzing! You want to whip this mixture until you reach soft peaks. That means when you lift the whisk, the cream forms a gentle, floppy curl at the top—not stiff peaks, but definitely not soup. It should hold its shape nicely when spread.
Finalizing and Chilling the Roasted Berries Tart
With your creamy topping ready, lovingly spread it over those roasted berries sitting in the tart shell. Make it look beautiful, or just slather it on—I won’t judge! The final, vital step for a clean slice and perfect texture in our Roasted Berries Tart is chilling. You absolutely must pop this whole thing into the refrigerator for at least 30 minutes before you even think about cutting it. This lets the shell firm back up and the fruits settle against the cream.
Tips for the Perfect Roasted Berries Tart
Even though this Roasted Berries Tart is super straightforward, there are just a couple of little things I’ve learned over time that really elevate it from “good” to “I need the recipe right now.” Since we are relying on roasting to do most of the heavy lifting, how you prep those berries matters! You want great flavor without worrying about a soggy crust—that’s always the goal with any good tart, right?
Berry Selection and Preparation for Your Roasted Berries Tart
The recipe note mentions using firm berries, and that’s excellent advice. If you use berries that are already too soft—maybe they are sitting at the bottom of the fruit bowl—they will turn into mush when they roast. When I’m shopping, I look for berries that are plump and hold their shape well. I love using a mix because the different acid and sugar levels create a complex flavor that’s just fantastic. If you only use blueberries, that’s fine, but make sure they look firm and unblemished when you grab them!
You don’t need to worry about hulling strawberries or anything complicated, but check them over quickly. If you are using strawberries, I generally quarter the larger ones so they roast evenly next to the little blueberries. A good mix of textures after roasting is always a win!
Adjusting Filling Consistency
Most of the time, roasting the berries with that tiny bit of cornstarch is all you need to get a perfectly luscious filling. It thickens up beautifully as it cools and settles into that shortcrust pastry shell. But what if you are in a huge rush or maybe your berries were just extra watery this week? You have an option!
If you want a super firm filling—maybe you want to transport this tart a little way, or you just prefer a very dense fruit layer—you can certainly skip the oven altogether! Just put all those filling ingredients (berries, sugar, lemon, cornstarch) into a small saucepan over medium heat. Keep stirring gently until the juices start bubbling nicely and the mixture is thick enough to coat the back of a spoon, almost like a thin jam. Then, let it cool completely before spreading it into your ready-to-fill crust. It’s just a different route to the same goal, but I always prefer the flavor the roasting gives the fruit. You might also love that technique in this brown butter strawberry peach pie if you want another fruit idea!
Variations on the Roasted Berries Tart Theme
Part of the fun of having a simple recipe like this Roasted Berries Tart is that it acts like a totally delicious blank canvas! You can totally make it your own without adding any stress. I love experimenting when I have extra berries or just want to change things up for a new crowd. Since the base roasting process is so quick and forgiving, it practically begs for little upgrades!
Flavor Twists for Your Roasted Berries Tart
My go-to quick flavor boost involves the cream topping. You know how we just whip the heavy cream with powdered sugar? Try adding just half a teaspoon of pure vanilla extract right when you start whipping. It makes the cream taste like it took five times longer to make! It pairs so beautifully with the natural sweetness of the fruit.
If you want to bump up the warmth in the fruit itself, right before you pop those berries into the oven, try adding the tiniest pinch—I mean a *pinch*—of ground cinnamon to the mix along with the sugar and lemon juice. Cinnamon and berries are old friends, and it adds this lovely background warmth that is just fantastic, especially if you serve it slightly warm instead of chilled.
Crust and Topping Substitutions
If you’re trying to make this even faster or just don’t like standard shortcrust pastry, you have options! My favorite swap is using a pre-made graham cracker crust. If you do that, you skip the chilling time in the fridge most of the time, making the tart ready even quicker. Just press the roasted berries right into that crumbly base.
For the topping, while the homemade whipped cream is divine, sometimes I want something a little tangier to cut through the sweetness. Try substituting the heavy cream and powdered sugar for a cup of crème fraîche. You just whisk the crème fraîche gently with a tiny drizzle of honey until it’s smooth and spreadable. It gives the whole Roasted Berries Tart a slightly sophisticated, cultured feel. If you were looking for another dessert idea that handles substitutions well, this apple crisp cheesecake uses a simple topping over a complex base, too!
Serving Suggestions for the Roasted Berries Tart
This tart is so versatile, isn’t it? It manages to feel fancy enough for a dinner party dessert but simple enough for a Tuesday afternoon snack! The combination of warm, roasted, jammy fruit and that cool, fluffy cream means it pairs well with almost anything cooling or slightly aromatic. I like to think about what beverage will cut through the sweetness just a little bit.
If you’re serving this after a big meal, a very light, crisp wine is wonderful. Think about a slightly sweet Prosecco or maybe even a very light dessert wine that doesn’t overpower the berries. I’m not a huge wine connoisseur, but something bubbly always seems to fit the bill!
For daytime serving, especially brunch or a mid-morning treat, you absolutely need a great beverage. My personal favorite pairing that I make all the time is a fantastic glass of iced tea—you can check out my recipe for traditional southern iced sweet tea if you want to try it. It’s cool, refreshing, and the tannic quality is just lovely against the sugar in the cream.
And of course, a strong, freshly brewed cup of coffee is always welcome. Whether you take it black or add a little cream, the slight bitterness of the coffee really balances the sweetness of the topping and lets the tartness of the roasted berries really shine through. You can serve it slightly warm, straight from the oven if you haven’t chilled it yet, or perfectly cold after it sets up in the fridge. Either way, have a comforting drink ready!
Storage and Leftovers for Your Roasted Berries Tart
This is the tough part, right? Trying to save part of a baked good when it tastes so unbelievably good fresh! Because we have that gloriously crisp shortcrust pastry and that beautiful, light whipped cream topping, storing the Roasted Berries Tart requires just a little bit of strategy. If you don’t plan on eating the whole thing in one sitting (good luck!), you need to handle the components correctly.
The whipped cream is the main diva here; it really doesn’t like sitting around too long, even refrigerated. If you made the tart completely and topped it immediately, I’d say try to eat it within about 4 hours if you want that cloud-like texture to stay perfect. After that, the moisture from the berries starts to leech into the cream, and it can get a little sad and saggy.
Here is my personal trick for keeping this Roasted Berries Tart spectacular for longer: store the elements separately! After roasting the filling and letting it cool mostly down, spread those gorgeous berries into the crust, but skip the whipped cream topping entirely. Cover the filled tart shell tightly with plastic wrap and pop it in the fridge. It’ll be good like that for a full day, maybe even two. When you are ready to serve, whip up a fresh batch of cream—it only takes two minutes!—and top only the slices you plan on eating right then. That way, the crust stays crisp, and the cream is always fresh!
Frequently Asked Questions About the Roasted Berries Tart
It’s so common to have questions pop up when you try a new technique, especially when we stray from just dumping everything in a bowl! Roasting the fruit is the key step here, so that’s where most of the curiosity comes from. I’ve gathered up the most common things folks ask me about this Roasted Berries Tart to make sure your results are perfect every time. If you loved how easy this was, maybe you should check out the tips in my easy peach cobbler next!
Can I use frozen berries in this Roasted Berries Tart?
Oh, totally! Life happens, and sometimes the freezer is your best friend. If you are using frozen berries, you need to handle them patiently. Don’t throw them in the oven rock-solid frozen! Let them thaw on the counter for about an hour first, and here’s the crucial bit: you must drain off as much of that extra liquid as you possibly can before you toss them with the sugar and cornstarch. Frozen berries release way more water than fresh, and we want juicy, not soupy, roasting results for our tart!
How long does the whipped cream topping last on the tart?
This is where the chilling time we talked about really matters. If you cover the whole assembled tart (berries, crust and all!) and keep it refrigerated, the cream will typically stay nice for about 12 hours. After that, it starts to get a little watery as it absorbs liquid from the roasted berries below it, which can also soften your lovely shortcrust pastry too much. For the absolute best texture—that light, airy fluffiness—I recommend topping the tart no more than 4 hours before you plan to serve it. Fresh is always best with whipped cream!
What temperature should I use for roasting the berries?
We stick pretty firmly to 375 degrees Fahrenheit (190 Celsius) for this recipe, and there’s a good reason why roasting is better than just mixing the raw fruit! When you mix raw berries into a crust, the moisture they release often turns the bottom of the pastry soggy before the crust has a chance to fully bake. Roasting them first allows the heat to concentrate the sugars, thicken the liquids naturally with the cornstarch, and gently soften the fruit so it forms a perfect, thick layer of filling *before* it ever touches the pastry. It’s a temperature designed to maximize flavor concentration swiftly!
Nutritional Snapshot of This Roasted Berries Tart
Okay, I know that for most of us, when we are making something this delicious, we aren’t tracking every single calorie! But since this is a family favorite and I want you to feel good about serving it, I tracked down the general estimates for a single slice based on the recipe amounts. Keep in mind that because we are using a pre-made shortcrust pastry shell, the fat and sodium levels can vary wildly depending on the brand you grab off the shelf.
These numbers are based on yielding 8 slices from the whole tart. If you cut bigger pieces—and trust me, sometimes I do!—the numbers will naturally go up, so treat these as a fantastic guideline rather than gospel!
Here’s what we are generally looking at per slice:
- Serving Size: 1 slice
- Calories: 250
- Sugar: 18g (A lot of this comes naturally from the fruit, plus the top dusting!)
- Sodium: 80mg
- Fat: 14g
- Saturated Fat: 8g
- Unsaturated Fat: 6g
- Trans Fat: 0g
- Carbohydrates: 30g
- Fiber: 2g
- Protein: 3g
- Cholesterol: 45mg
See? It’s really not bad for a gorgeous dessert! The berries truly keep the sugar content lower than if we were making, say, a heavily baked custard. Just remember that these estimates are just that—estimates. If you use a lighter whipping cream or skip the sugar on top of the berries, you’ll easily shave off a few points. Enjoy the treat!
Share Your Delicious Roasted Berries Tart Creations
Now comes the fun part! Once you’ve tasted this simple, elegant Roasted Berries Tart—and I know you will just devour it—I absolutely want to hear all about it. Did you use all strawberries? Did you try my Crème Fraîche trick? Don’t keep that deliciousness to yourself!
The real joy in sharing these recipes, for me, is seeing how you all bring them to life in your own kitchens. It’s what keeps me inspired to keep testing and tweaking things!
Please, please leave a comment right down below this post. Tell me what you thought! Did it come together in 15 minutes like mine did? Did the crust stay crisp? A quick rating or even just a sentence helps other bakers feel confident trying the recipe out.
And if you shared a photo of your beautiful tart masterpiece on Instagram or Facebook, tag me! I love seeing those jewel-toned berries peeking out from under that cool whipped cream. Seriously, tag away! You can also send any specific questions or feedback right through my contact page here if you have something more detailed you want to chat about privately. Happy baking, friends, and enjoy every single bite of that simple, roasted perfection!
Print
Roasted Berry Tart
- Total Time: 55 min
- Yield: 8 servings 1x
- Diet: Vegetarian
Description
A simple tart featuring sweet roasted berries in a crisp crust.
Ingredients
- 1 pre-made shortcrust pastry shell (9-inch)
- 2 cups mixed berries (strawberries, blueberries, raspberries)
- 2 tablespoons granulated sugar
- 1 tablespoon lemon juice
- 1 teaspoon cornstarch
- 1/4 cup heavy cream
- 1 tablespoon powdered sugar
Instructions
- Preheat your oven to 375 degrees Fahrenheit (190 degrees Celsius).
- Place the mixed berries in a small baking dish.
- Toss the berries with granulated sugar, lemon juice, and cornstarch.
- Roast the berries for 15 minutes, until slightly softened and juicy.
- Remove the berries from the oven and let them cool for 10 minutes.
- Spoon the cooled roasted berries into the pre-made pastry shell.
- In a small bowl, whip the heavy cream and powdered sugar until soft peaks form.
- Spread the whipped cream over the berries in the tart shell.
- Chill the tart for at least 30 minutes before slicing and serving.
Notes
- You can use any combination of firm berries for this recipe.
- If you prefer a firmer filling, cook the berries on the stovetop until the juices thicken before cooling.
- Prep Time: 10 min
- Cook Time: 15 min
- Category: Dessert
- Method: Baking
- Cuisine: American
Nutrition
- Serving Size: 1 slice
- Calories: 250
- Sugar: 18
- Sodium: 80
- Fat: 14
- Saturated Fat: 8
- Unsaturated Fat: 6
- Trans Fat: 0
- Carbohydrates: 30
- Fiber: 2
- Protein: 3
- Cholesterol: 45
Keywords: roasted berries tart, berry dessert, shortcrust pastry, easy tart recipe, summer dessert