Honestly, sometimes the most satisfying things to bake are the simplest ones, right? Forget giant layer cakes for a minute—I’m talking about that deep, satisfying *snap* you get from a perfect cracker. I’ve finally cracked the code for the most wonderfully crisp, homemade chocolate crackers you’ve ever tasted. They come together faster than you can decide what to watch on TV, and trust me, the dark, rich cocoa flavor beats anything store-bought. It’s so rewarding making something this delightfully simple totally from scratch!

Why You Will Love These Homemade Chocolate Crackers
Seriously, put down that bag of chips. These are the crackers you didn’t know you needed! They are quick, intense on flavor, and just unbelievably crunchy. I’m talking about the ultimate crispy dark chocolate experience.
- They are ready faster than you can decide on a dip!
- The flavor payoff from simple cocoa is huge.
- That beautiful, consistent snap you get when you break them.
Quick Prep Time for Your Chocolate Crackers
You really only need about 15 minutes of actual hands-on time to whisk the dry stuff together and cut in the butter. Before you know it, you’ll have a batch of fresh chocolate crackers cooling on the rack. It’s a lifesaver when you’re craving a little something sweet and savory, fast.
Perfectly Crisp Texture Every Time
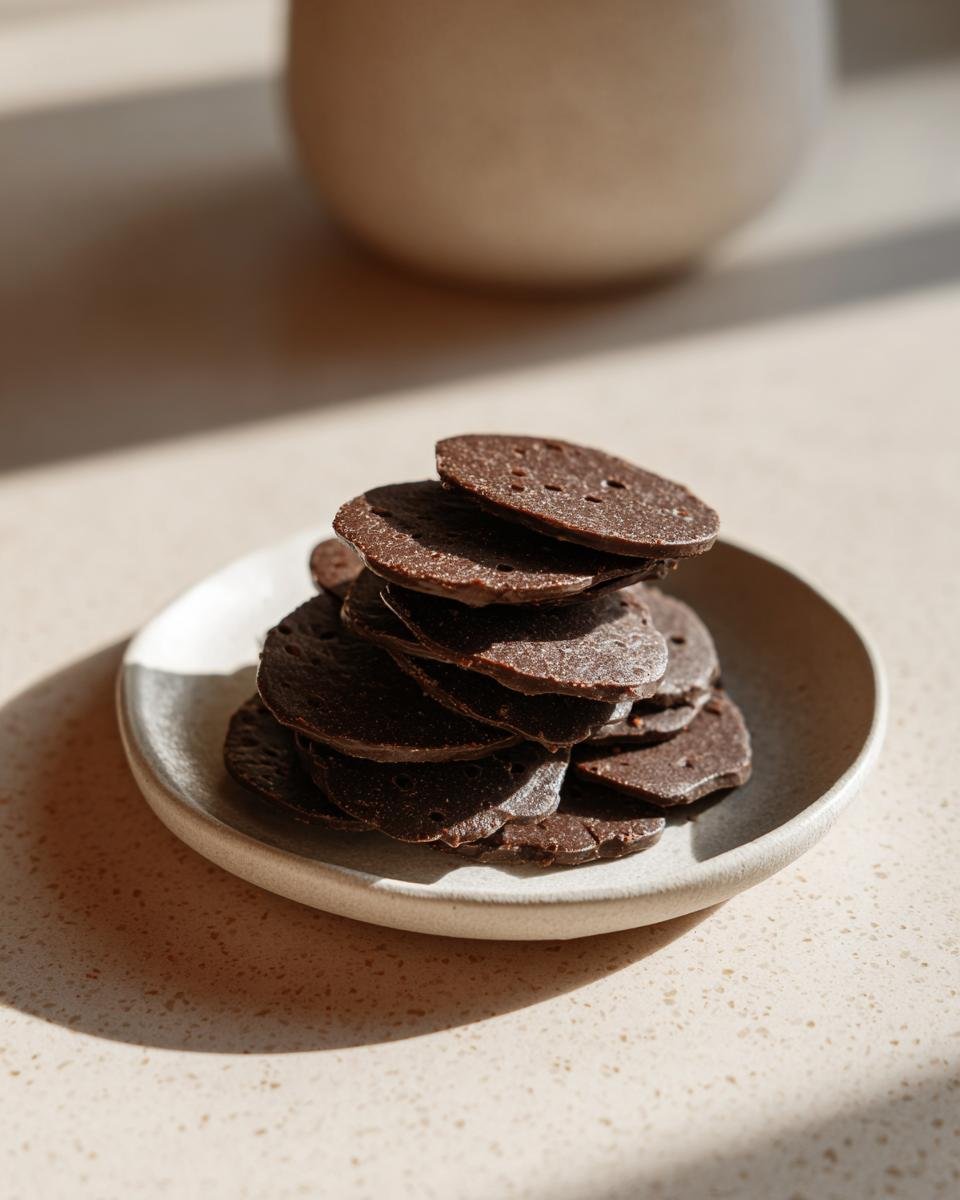
The secret to that amazing crispness—the part that makes these the best homemade crackers—is rolling the dough super thin and using ice-cold ingredients. Don’t skip the chilling time! If you follow those steps, you are guaranteed that satisfying *crack* sound when you bite in.
Essential Ingredients for Perfect Chocolate Crackers
Okay, let’s talk about what you need. Remember, simple ingredients mean the quality really shines through! We aren’t using a million things here—just the basics done right. Having everything measured out beforehand makes this part fly by. We need flour, cocoa, a touch of sugar, baking soda, salt, and the star, cold butter, plus just enough water to bring it all home.
If you want to see how other people make their super crispy stuff, check out this amazing guide on achieving cracker perfection. It gives great insight into why technique matters!
Ingredient Notes and Substitutions for Chocolate Crackers
For the cocoa powder, please use unsweetened, Dutch-process if you have it—it gives the richest color! The most crucial part, truly, is the butter: it must be cold unsalted butter, cut into pieces. If your butter is warm, you’re making pastry, not crisp chocolate crackers! You want that fat to stay separate until baking so it steams and creates those perfect little air pockets for crunch. Don’t try to sneak in melted butter, or you’ll be sad!
Equipment Needed to Make Your Chocolate Crackers
You don’t need a fancy kitchen setup for these, which is another reason I love them so much! Mostly, you just need things you probably already have lying around. If you bake at all, you’re halfway there.
Here’s the short list of tools I grab when I’m making these rich cocoa crackers:
- A good sturdy mixing bowl—nothing too small because we are combining dry ingredients.
- Your hands, a pastry blender, or even two forks! This is for cutting in the cold butter.
- A rolling pin is absolutely essential. You need to press that dough out paper-thin!
- Baking sheets, naturally. I usually use two so I can bake a full batch quickly.
- Parchment paper. Oh my gosh, don’t skip this; it makes cleanup a dream, and these can stick if they get too warm.
- A fork or skewer for poking holes.
Step-by-Step Instructions for Crisp Chocolate Crackers
Alright, let’s get baking because this is where the magic happens! Follow these steps exactly, especially regarding temperature and mixing, and you’ll end up with wafer-thin, dark chocolate delight. We are aiming for that perfect snap, so keep everything cool!
First, you’ll mix up your dry ingredients—the flour, cocoa, sugar, salt, and soda. Then comes the butter work. You need to cut that cold butter into those dry bits until it looks sandy, like coarse crumbs. If you want a deep dive into the science of cracker structure, this article on getting that crunch is fantastic!
Once the butter is incorporated, drizzle in the cold water just until the dough holds together. Don’t squeeze it or push it! Just bring it together. Then, wrap that little disk tightly and stick it in the fridge for a solid 30 minutes. That chill time is non-negotiable for those crisp chocolate crackers!
Mixing and Chilling the Chocolate Crackers Dough
When you are combining the wet and dry, use a gentle hand. Overmixing develops gluten, and gluten means chewy. Chewy crackers are sad crackers! We want them snappy and crumbly. Once you’ve added just enough of that cold water, pat it gently into a disk. Wrapping it up tight keeps the moisture locked in and lets the flour relax a little. A happy dough is a crispy dough, remember that as you hide the disk away for that recommended 30 minutes!
Rolling, Cutting, and Baking Your Chocolate Crackers
Preheat your oven to 350 degrees Fahrenheit (175 Celsius) while the dough chills. When the time’s up, move your dough to a lightly floured spot. You need to roll this out thin—I mean *really* thin, about 1/16 of an inch. If you can see a little bit of your counter surface through it, you’re good! Use a knife or pastry wheel to cut squares, and here’s your other crucial step: prick every single one of those things multiple times with a fork. This stops them from puffing up like little chocolate balloons instead of lying flat like proper chocolate crackers. Bake them for about 10 to 12 minutes until they smell toasty and look dry. Cool them slowly on a rack!
Expert Tips for Achieving the Best Chocolate Crackers
I could stop right there with the recipe, but to make these truly exceptional—the kind of chocolate crackers that disappear instantly—you need to know my little tricks that aren’t strictly written down in the steps. Honestly, a good baker always learns to read the dough!
When you roll out your dough, remember the note about rolling it even thinner than you think is necessary. If you can hold your dough up to the light and it looks almost translucent, that’s when you’re going to get that *right* snap. Don’t be shy!
Also, if you like a little sparkle, take the advice from the notes: sprinkle a tiny bit of extra granulated sugar right on top before they go into the 350-degree oven. It melts slightly and gives the outside a fantastic, super-sweet crust that balances the dark cocoa perfectly.
My personal secret trick? Forget using a standard knife to cut your squares. Grab a pizza cutter! It glides through the cold dough so much easier and gives you perfectly straight edges. No raggedy crumbs right from the start. It makes separating them post-baking much cleaner, too.
Variations for Your Chocolate Crackers Recipe
Since the base recipe for these chocolate crackers is so simple, it’s begging for little additions to jazz things up! Baking should always be fun and customizable, right? I always keep a few ideas up my sleeve for when I need a slightly different flavor profile.
For example, if you want a little salty kiss with that rich dark cocoa, grab some flaky sea salt. Just a tiny pinch sprinkled right before baking elevates them instantly. You could also mix a quarter teaspoon of ground cinnamon right into the dry ingredients—it warms up the chocolate beautifully without changing the texture at all.
Or maybe you need some texture? Try folding in just two tablespoons of finely chopped pecans or walnuts right at the end, after the water is added. You don’t want too many, though; we still need the crisp, flat texture of a great cracker!

Serving Suggestions for Homemade Chocolate Crackers
Now that you have this stunning stash of incredibly crisp, dark chocolate crackers, the fun part begins: figuring out what to eat them with! Because they aren’t overly sweet, they are so versatile. They totally transcend the usual cookie category.
The complex, slightly bitter cocoa flavor pairs amazingly well with tangy or creamy things. If you have friends over, you absolutely have to throw these onto a cheese board. They are a way better pairing than those plain water crackers you usually see!
I recently put together a quick little snack board with these crackers—it was so simple, but everyone raved. You can check out my favorite easy tips for styling a board here: Effortless Entertaining.
Here are a few ways my family loves to enjoy our homemade chocolate crackers:
- With Creamy Cheese: Try a smear of creamy goat cheese or a robust brie. The saltiness and tang cut through the chocolate beautifully.
- Sweet Dips: They are fantastic dipped into slightly tart raspberry jam or a nice, thick Greek yogurt dip sweetened just a little bit with honey.
- For Coffee Time: Honestly, they are perfect just broken into pieces and enjoyed straight alongside a hot cup of black coffee or an Americano. The slight bitterness of the coffee really makes the cocoa notes pop.
- As a Base: Use them as the base carrier for sliced strawberries, thin apple wedges, or even a dollop of mascarpone cheese. They definitely hold up well under toppings, which is why they’re such a reliable cracker!
Storage and Reheating Instructions for Chocolate Crackers
The best part about making these chocolate crackers is that they are generally very stable, thanks to the low-moisture dough. You definitely don’t have to worry about eating them all in one day, though I have certainly tried!
Once they are completely cool—and I mean stone cold—you need to get them into an airtight container immediately. If you try to store them while they are still even slightly warm, the condensation trapped inside the container will make them instantly lose that gorgeous crisp texture we worked so hard for.
They sit happily on the counter, locked away from humidity, for at least a week. I find they stay wonderfully fresh at room temperature, just sitting right next to the coffee maker for easy snacking. Make sure the lid is secured tightly; humidity is the main enemy of a crisp cracker!
Now, sometimes life happens, or maybe you live somewhere really damp, and your delicious chocolate crackers lose their snap sitting on the counter. Don’t panic! You can absolutely bring them back to life. It’s my go-to move when I think a batch has gone a little soft.
Just spread the slightly stale crackers out in a single layer on a clean baking sheet—no need to grease anything! Pop them into a very low oven, like 300 degrees Fahrenheit, for about five to seven minutes. You aren’t trying to bake them again; you are just gently warming them up to force out that trapped moisture.
Pull them out, let them cool completely on the baking sheet for about ten minutes, and suddenly, you’re back in business with that satisfying crunch. It works like a charm every single time!
Frequently Asked Questions About Chocolate Crackers
I get so many questions about this recipe because everyone wants that perfect snap! It just goes to show how much people love getting their snack game right. Here are a few things I hear often from people baking their own batch of homemade chocolate crackers.
Can I make these Chocolate Crackers vegan?
That’s a fantastic question! Since the recipe is so pure—just flour, cocoa, sugar, and butter, plus water—swapping out the butter is the main thing. If vegan is what you need, yes, you absolutely can! Instead of cold unsalted butter, you’ll want to use cold, solid coconut oil, cut into the same small pieces. You might have to work a little faster because coconut oil softens quicker than butter, but it will give you a great texture for those cocoa crackers. Just be sure to keep that oil very cold!
Why are my homemade crackers not crisp?
Oh, this is the saddest thing! If they aren’t crisp, nine times out of ten, it comes down to one of two things: You didn’t roll them thin enough, or you didn’t bake them long enough. Remember, we are aiming for cracker-thin, almost see-through! If they look thick in the middle when you pull them out, they will be chewy once they cool down. Give them an extra two minutes in the oven if you suspect they are underdone. Don’t pull them out and let them sit on the pan—they must cool completely on the wire rack to fully crisp up!
What is the best way to store leftover Chocolate Crackers?
If you want those homemade crackers to stay snappy for more than a day, storage is everything. You absolutely must keep them in a seriously airtight container once they are totally cooled down. I mean the kind with a latch or a really tight seal. If they are exposed to any humidity or air, they will quickly turn soft, and nobody wants a limp chocolate cracker! If you notice they’ve softened slightly over the week, just pop them back into a 300-degree oven for about five minutes to revive that crunch.
Estimated Nutritional Information for These Chocolate Crackers
I always feel so much better knowing what’s in the snacks I’m serving up, even though baking for fun isn’t exactly about counting every calorie! Remember, because these are homemade chocolate crackers, this information is just an estimate based on the ingredients used and the standard yield of about three dozen crackers.
When you look at the numbers, you’ll see they are a lovely, moderate treat—not too much sugar, and a nice bit of fiber from the cocoa!
Here’s the breakdown based on a serving size of 5 crackers:
- Calories: Approximately 120
- Total Fat: About 5 grams, with 3 grams coming from the saturated fat in that delicious cold butter.
- Carbohydrates: Around 17 grams, which includes 4 grams of sugar.
- Protein: About 2 grams.
- Sodium: Pretty standard for a baked snack, around 90mg.
If you find yourself munching on six or seven crackers instead of five, just add the corresponding extra amounts! The important thing is that you’re enjoying truly wonderful homemade chocolate crackers without all the weird stuff you find in the ingredient list of the boxed versions. Happy snacking!
Share Your Success with These Chocolate Crackers
Okay, now that you’ve mastered the art of the crisp, dark, homemade chocolate crackers, I absolutely need to hear about them! Seriously, don’t just make them and eat them in secret. I want to see your perfect snaps and your unique toppings!
When you pull that first batch out of the oven and hear that sound—that perfect *crack*—please snap a picture! Tag me on social media so I can celebrate your baking victory with you. It means the world to me when my recipes bring delicious homemade snacks into your life.
And if you tried one of my little tips—like rolling them super thin or sprinkling on that extra sugar crust—let me know how it worked out in the comments below. Ratings are fantastic, too! A simple five-star rating right on the recipe page tells me that my foolproof method for these easy cocoa crackers worked for you!
Go ahead, grab that jar of jam or that sharp cheese, and enjoy your reward. You just successfully baked world-class chocolate crackers!
Print
Simple Chocolate Crackers
- Total Time: 57 min
- Yield: About 3 dozen 1x
- Diet: Vegetarian
Description
A recipe for making crisp, homemade chocolate crackers.
Ingredients
- 1 cup all-purpose flour
- 1/4 cup unsweetened cocoa powder
- 1/2 teaspoon baking soda
- 1/4 teaspoon salt
- 1/4 cup granulated sugar
- 4 tablespoons cold unsalted butter, cut into pieces
- 1/4 cup cold water
Instructions
- Combine flour, cocoa powder, baking soda, salt, and sugar in a bowl.
- Cut in the cold butter using a pastry blender or your fingers until the mixture resembles coarse crumbs.
- Add the cold water one tablespoon at a time, mixing until the dough just comes together. Do not overmix.
- Form the dough into a disk, wrap it, and chill for 30 minutes.
- Preheat your oven to 350 degrees Fahrenheit (175 degrees Celsius). Line a baking sheet with parchment paper.
- On a lightly floured surface, roll the dough out very thin, about 1/16 inch thick.
- Cut the dough into small squares or desired shapes. Prick each cracker several times with a fork.
- Transfer the crackers to the prepared baking sheet.
- Bake for 10 to 12 minutes, or until crisp.
- Cool completely on a wire rack before serving.
Notes
- For thinner crackers, roll the dough even thinner before baking.
- You can sprinkle a little extra sugar on top before baking for a sweeter crust.
- Prep Time: 15 min
- Cook Time: 12 min
- Category: Snack
- Method: Baking
- Cuisine: American
Nutrition
- Serving Size: 5 crackers
- Calories: 120
- Sugar: 4
- Sodium: 90
- Fat: 5
- Saturated Fat: 3
- Unsaturated Fat: 2
- Trans Fat: 0
- Carbohydrates: 17
- Fiber: 2
- Protein: 2
- Cholesterol: 10
Keywords: chocolate crackers, homemade crackers, cocoa crackers, crisp snack, easy baking