Oh my gosh, when the weather starts to chill—even just a little bit—my brain immediately starts smelling cinnamon and butter! Holiday baking is my absolute favorite time of year, and I feel like you truly can’t have a proper Christmas spread without something traditional and beautiful on it. That’s why I’m so excited to share my recipe for these **Delightful Italian Christmas Cookies A Festive Tradition** with you today. Seriously, these are the easiest shortbread-style cookies you will ever make, but they look like I spent all day fussing over them! They hold their shape perfectly and just beg to be dusted with snow-white powdered sugar. For me, this recipe is such a simple way to bring a little authentic Italian cheer right into my own kitchen without any stress.
Why Delightful Italian Christmas Cookies A Festive Tradition Belong on Your Table
I always feel pressure when holiday baking time rolls around, but these cookies? They are my secret weapon against kitchen chaos! They fulfill that deep need for tradition without requiring me to spend hours rolling out dough or making fussy fillings. Trust me when I say these bring such an authentic, old-world feel to the cookie tray. They are elegant but completely unfussy, which is the best kind of holiday recipe!
- They require only pantry staples—nothing fancy needed!
- The dough comes together fast, which means less time waiting and more time decorating (or eating them raw, don’t judge me!).
- Their simple, buttery flavor pairs perfectly with strong Italian coffee or a cup of hot cocoa.
If you’re looking to add something special that feels truly traditional, check out this link for some other great ideas, like diabetic-friendly christmas cookies.
Authentic Taste and Simple Preparation
You might think authentic Italian sweets are complicated, but not these! We just use butter, flour, a little sugar, and vanilla. The flavor is pure and delicate. It’s all about high-quality basics done right, which is so satisfying.

The Perfect Base for Holiday Decoration
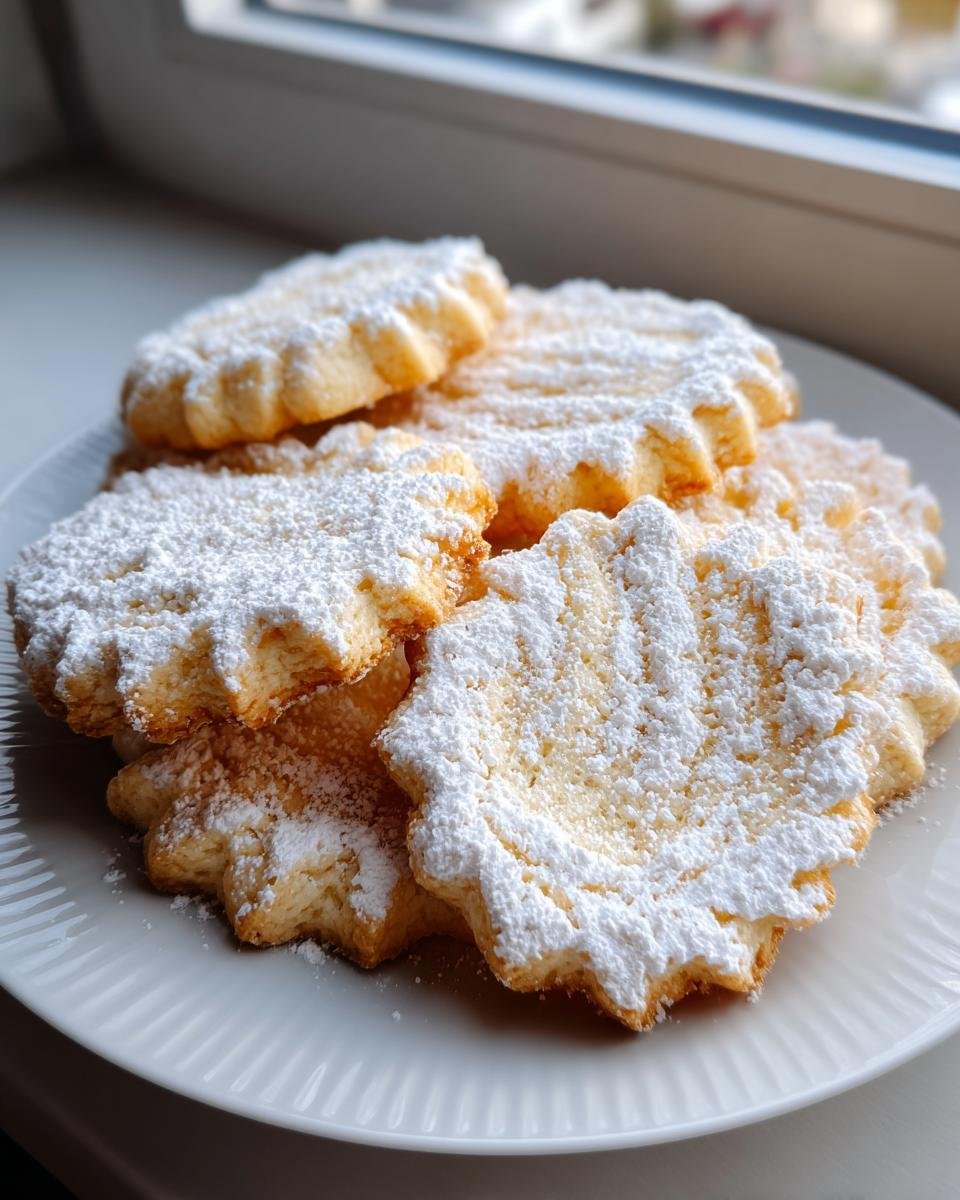
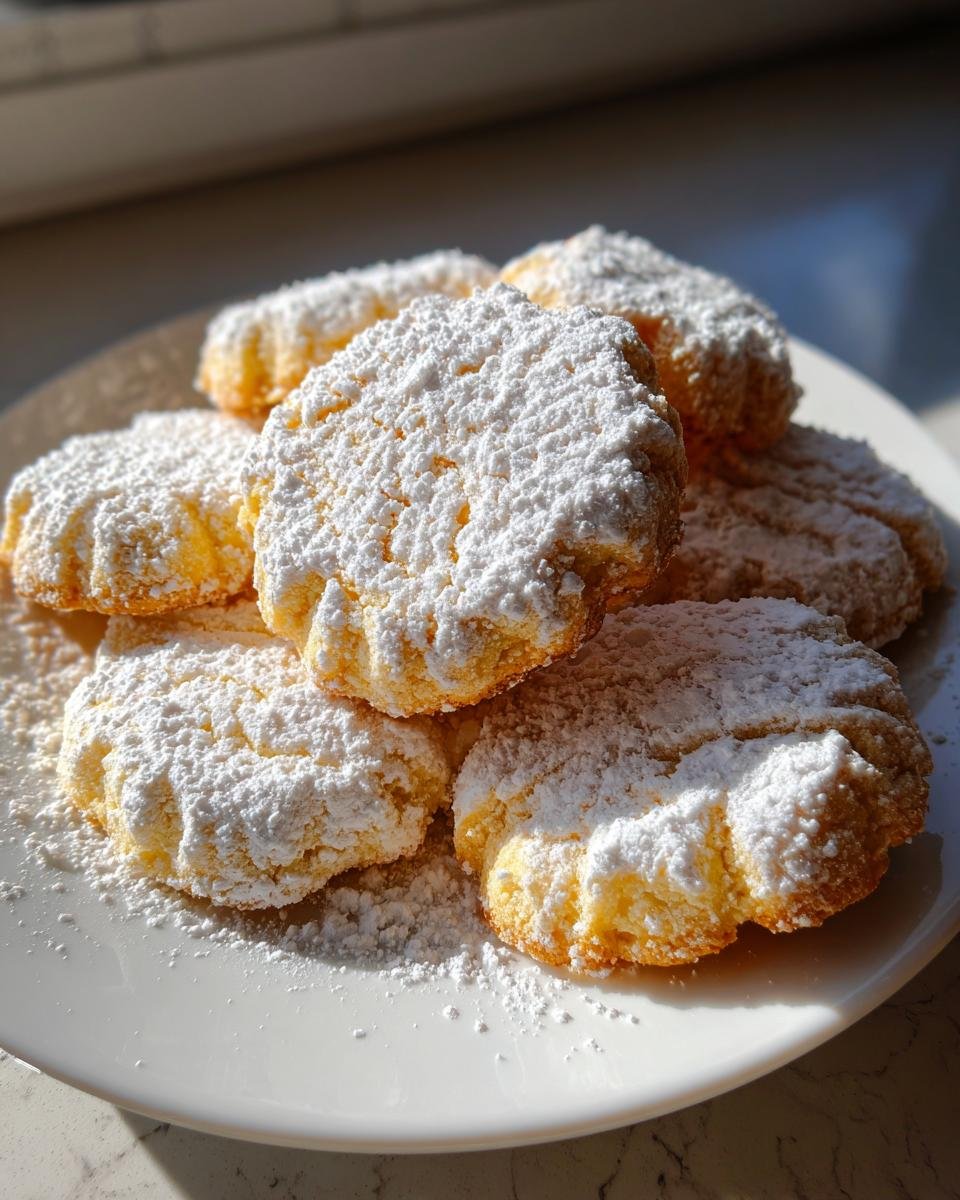
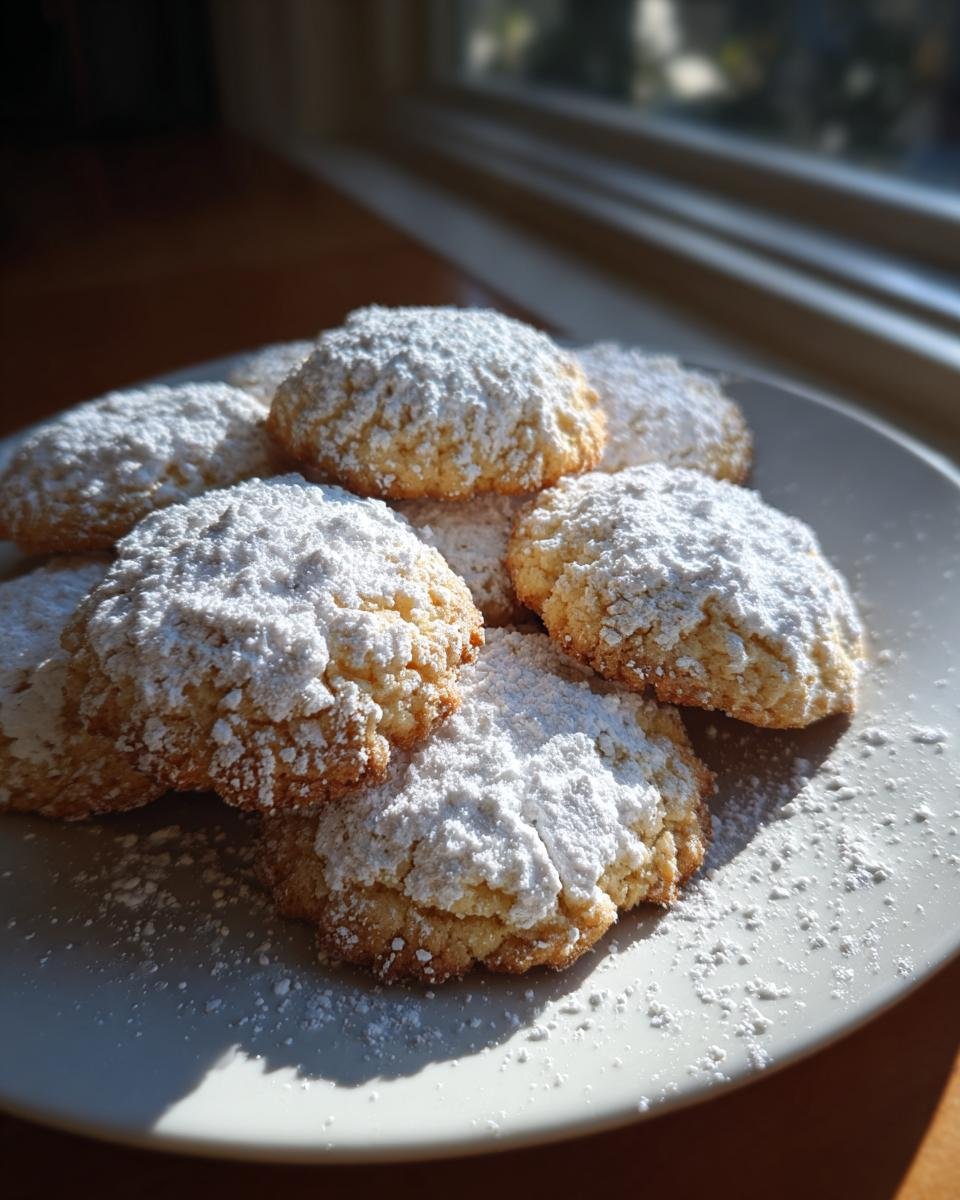
These little cuties are beautiful all on their own with just a snowdrift of powdered sugar. But because the dough is sturdy, they are fantastic for using cookie cutters. You can keep them simple or go wild with lemon glaze or a drizzle of melted dark chocolate. They truly are the perfect, blank canvas for your **Delightful Italian Christmas Cookies A Festive Tradition**.
Gathering Ingredients for Delightful Italian Christmas Cookies A Festive Tradition
Okay, one of the best parts of this recipe is how simple the ingredient list is! You probably have most of this stuff right in your pantry this week. But listen carefully, because technique matters even before we start mixing. Because we aren’t using baking soda or powder, the texture relies so much on getting the butter and flour right.
I always take out my ingredients beforehand so they can come up to temp. If you chill this dough right after mixing, you’ll get a cleaner cut, but the butter needs to be soft enough to blend nicely with the dry stuff first.
Dry Components
For the dry components, you need exactly 2 cups of all-purpose flour. Remember what I always say? Don’t just scoop it out of the bag! Spoon the flour lightly into your measuring cup and then level it off—that tiny difference keeps the cookies from spreading too much. Whisk that gently with just 1/2 cup of granulated sugar, and a tiny pinch of salt: 1/4 teaspoon will do the trick. That’s it for the dry team!
Wet Components and Finishing Touches
Now for the good stuff. You need 1/2 cup of unsalted butter, and this is important: it absolutely must be softened but still slightly cool, not melted or greasy. You want that creamy texture we talk about in the mixing section. We also add one large egg, 1 teaspoon of vanilla extract, and 1/4 cup of milk. Feel free to check out my post on homemade cleaning sprays right after this—you’ll need a clean counter to roll out all these cookies! Finally, don’t forget the 1/2 cup of powdered sugar we’ll use later for that perfect dusty finish.
Step-by-Step Instructions for Delightful Italian Christmas Cookies A Festive Tradition
Alright, let’s get baking! This isn’t a marathon; it’s a lovely little jog through holiday cheer. The beauty of these sugar cookies is that when you follow these steps, you don’t have to worry about them turning into flat, sad puddles. The chilling step is mandatory, as it locks the shape in place. I’ve got my stand mixer ready, but honestly, you can do most of this by hand if you want that extra workout before eating them all later!
Mixing the Dough Base
First things first: grab that big bowl and whisk together your dry ingredients—the flour, the sugar, and the salt. Give it a good swirl just to make sure everything is evenly distributed. Now, onto the butter. Since you softened it nicely, you need to cut it in. If you have a pastry blender, use it! If you’re like me sometimes and just dive in with your hands, use your fingertips. You want to work that butter into the dry mix until it looks exactly like coarse, wet breadcrumbs. We’re looking for pea-sized pieces of butter coating the flour. Don’t overwork it here, or the texture will suffer later!
Combining Wet and Dry Ingredients
In a separate little bowl, quickly whisk your egg, the vanilla extract, and the milk together. Just a quick marriage of the wet ingredients. Now, pour this liquid mixture right into your crumbly butter and flour base all at once. Mix it on low speed, or gently with a spoon, just until a soft dough starts to come together. And here is my big tip I learned from my Nonna: **Do not overmix**! Overmixing develops the gluten in the flour, and suddenly your delightful cookies turn into chewy little crackers. Stop stirring the second you don’t see any dry flour streaks lying around. Seriously, stop. Stop before you think you should!
Chilling and Shaping
Once the dough ball is formed, flatten it slightly into a disc—this helps it chill faster, which we need! Wrap that beauty up tightly in some plastic wrap and send it to the fridge for a solid 30 minutes. While that takes its cool-down break, grab your baking sheets and line them with parchment paper. This recipe is worth preserving on a good sheet—you can check out how I keep my baking sheets pristine when making things like Grandma’s perfect homemade bread.
After chilling, flour your counter lightly. Roll the dough out—and be careful not to roll it much thinner than about 1/4 inch thick. If the dough gets too warm while you’re rolling, just pop it back in the fridge for five minutes! Use your favorite cookie cutters—stars, bells, hearts, whatever brings you holiday joy—and place those cutouts about an inch apart on your prepared sheets.
Baking and Finishing Delightful Italian Christmas Cookies A Festive Tradition
Time for the oven! Preheat it to 350 degrees Fahrenheit (that’s 175 Celsius for my friends with the European ovens). These cookies bake quickly because they don’t have any leavening agents puffing them up. They need to bake for 10 to 12 minutes. You’re watching for the edges; they should just barely start to turn a faint, delicate golden color. If they are brown, you’ve gone too far! Pull them out, but resist grabbing them right away. Let them hang out on the hot baking sheet for about five minutes; this lets the cookie set up nicely. Then, carefully move them over to a wire rack to cool completely. Wait until they are totally cooled down—and I mean *totally*—before you bring out the powdered sugar. Dust them generously! It looks gorgeous and adds that final touch of sweetness.
Tips for Perfect Delightful Italian Christmas Cookies A Festive Tradition
Even with the simplest recipe, sometimes things go a little sideways in the kitchen. Don’t panic! These little butter cookies are forgiving, but a few quick adjustments can save your batch from disaster. I’ve had days where the kitchen humidity just ruins the dough structure, so I have a few tricks up my sleeve to rescue your **Delightful Italian Christmas Cookies A Festive Tradition**.
Managing Dough Consistency
Sometimes, even after chilling, the dough feels too dry—like it’s cracking apart when you try to press it together. If that happens, don’t just add milk randomly! Add liquid *one teaspoon* at a time, gently kneading it in by hand until it holds. Now, the bigger problem is usually the opposite: the dough is too sticky. If that happens after chilling, you might need to roll it between two sheets of plastic wrap instead of directly on the counter. If you knead in too much flour to compensate, these cookies get tough, so chilling out is always the first fix!
If your cookies are spreading out into those sad, flat discs while baking, it usually means your butter was too warm when you cut it in, or you skipped the chilling step. If you want crispy edges instead of soft ones, try popping the cut-out shapes onto the baking sheet for 10 minutes *before* you slide them into the oven. It helps the butter firm up right before it hits the heat. For extreme crispiness, check out this tip on amazing 1 secret for crispy pan banging cookies, though these traditional ones are better served tender!
Flavor Variations: Zest and Extracts
While the pure vanilla flavor is classic, this cookie is practically begging for a little citrus kick to make it extra festive! If you want to elevate your **Delightful Italian Christmas Cookies A Festive Tradition**, grab a microplane zester and zest a whole lemon or orange right into the dry ingredients along with the flour and sugar. Wow, the smell alone is incredible!
The oils in the zest infuse into the butter as you cut it in, giving you this bright, warm flavor that cuts through the richness of the butter. You only need the zest—don’t add the juice! The juice adds too much liquid and messes with our perfect dough balance. A half teaspoon of almond extract instead of some of the vanilla is another gorgeous swap if you’re feeling adventurous!
Storing Your Delightful Italian Christmas Cookies A Festive Tradition
The absolute worst part of holiday baking is finally being done, but then realizing you can’t eat them all right now! Good news: these aren’t the kind of cookies that go stale overnight. Since they are essentially a basic butter cookie, they hold up really well, which makes them fantastic for making ahead of time!
When it comes to storage, you want to keep the air out. Grab your best airtight containers—the ones with the tight seals are perfect. Layer them in there. You can put a small piece of parchment paper between layers if you used a lot of powdered sugar, just so the bottom layer doesn’t get too messy, but honestly, if you dusted them lightly, you can just stack them up.
You can keep these beauties happily sitting on your counter at room temperature for up to a full week! Yes, seven days of ready Christmas magic! This is why I love making a huge batch right after Thanksgiving. They are perfect for snacking throughout the busy season, and they are always ready for unexpected guests.
If you needed to make them even further ahead, you could definitely freeze the unbaked dough, too! Just wrap those chilled, cut-out shapes tightly. When you’re ready to bake, just pop them onto the lined baking sheet and add a minute or two to the baking time since they’ll be going in colder. It’s like pressing the pause button on your holiday cheer!
Frequently Asked Questions About Festive Italian Baking
I get so many messages asking about these cookies after the holidays, which tells me you all are just as obsessed as I am! Before you jump back to sipping your mulled wine, let me answer a few common things I hear about making these **Delightful Italian Christmas Cookies A Festive Tradition**.
Can I use self-rising flour for this recipe?
Oh, that’s a great question about adapting basic flour! I strongly advise against using self-rising flour here. This cookie relies on the precise balance of its elements—the salt is measured specifically for all-purpose flour. If you use self-rising, you’ll end up adding too much leavening agent, and even though it doesn’t have baking soda, the extra salt and leavener will make these cookies spread out more than we want. You need that dense, tender crumb that only regular all-purpose flour gives us!
What is the best way to dust them evenly with powdered sugar?
This is where the artistry comes in! You absolutely must wait until the cookies are completely cool, or you’ll just end up with a sticky, sweet glaze instead of that beautiful snowy look. Once they are cool, take a fine-mesh sieve—the smaller the holes, the better the result. Fill the sieve with powdered sugar and gently tap the side over the cookies. Don’t try to shake it too hard; just a light tap helps the sugar fall like soft snow on the counter. It’s a much better look than just dumping sugar from a bag!
Can I freeze the unbaked dough for these cookies?
Yes, absolutely! This is my top tip for surviving the crazy Christmas week. Once you’ve mixed the dough and chilled it for 30 minutes, you can wrap those flattened discs tightly in plastic wrap, and then maybe a layer of foil over that. They freeze beautifully for up to three months. When you are ready to bake, just pull the dough out, let it sit on the counter for maybe 15 minutes to soften just slightly, and then roll and cut as usual. If you freeze the *cut-out* shapes, you might want to add two extra minutes to the baking time.
Why do my cookies seem dull, not bright white after dusting?
That’s usually because the cookies weren’t fully cooled before dusting, like I mentioned above, so some of the sugar melted! But sometimes, humidity plays a trick on us. If your powdered sugar seems to be dissolving almost instantly, try moving your cooling rack to a drier spot for an hour to let the cookies fully breathe before you apply the finish. If you love those textured button cookies, you might want to look at some other fun ways to decorate by checking out my irresistible button cookies recipe for inspiration!
Estimated Nutritional Snapshot
Now, I know we aren’t making these cookies for their health benefits—they are a holiday tradition, after all! But I like to keep track of what we’re serving, even when it’s festive treats. I always run my recipes through a standard nutritional calculator when I post them, just so you have a general idea of what you’re getting into. Remember, these numbers are just estimates based on standard ratios and not measuring *your* exact butter softness!
This is just a general look at what one perfectly dusted, traditional Italian Christmas Cookie provides. They are wonderfully small, which helps us keep things managed!
- Serving Size: 1 cookie (But let’s be honest, you’ll eat more than one!)
- Calories: We’re looking right around 110 calories, which is fantastic for a buttery treat.
- Fat: About 5 grams total, with 3 grams of the saturated kind from that lovely butter we used.
- Carbohydrates: You’ll get about 15 grams of carbs here.
- Sugar: Because of the granulated sugar in the dough and the powdered sugar on top, expect around 7 grams per cookie.
- Protein: A small boost, around 2 grams, thanks to that single egg.
Don’t worry too much about things like cholesterol or sodium; they are coming in quite low for a baked good, which is a nice bonus! This recipe keeps things simple, avoiding weird additives or preservatives, so you get honest, good food energy to power you through wrapping presents. Eat one (or three!) and enjoy the holiday season!
Share Your Delightful Italian Christmas Cookies A Festive Tradition Creations
Wow, we made it! I truly hope you have as much fun making these **Delightful Italian Christmas Cookies A Festive Tradition** as I do every year. Now that your kitchen smells amazing and you have a beautiful stack of rustic, snowy cookies, I want to hear all about it!
Did you use stars or bells for your cutters? Did you add that lemon zest I mentioned? Please don’t be shy! Head down to the comments section right now and tell me how they turned out. Leaving a rating helps other bakers find this perfect, simple recipe too! If you snap a picture of your finished platter—maybe next to some Italian biscotti or panettone—please share it on social media and tag me! I absolutely adore seeing my recipes brought to life in your cozy holiday homes. If you have any tricky questions pop up later, you can always reach out via my contact page. Happy Holidays, friends!
Print
Delightful Italian Christmas Cookies
- Total Time: 32 min
- Yield: 2 dozen 1x
- Diet: Vegetarian
Description
A recipe for traditional Italian Christmas cookies that are simple to make.
Ingredients
- 2 cups all-purpose flour
- 1/2 cup granulated sugar
- 1/4 teaspoon salt
- 1/2 cup unsalted butter, softened
- 1 large egg
- 1 teaspoon vanilla extract
- 1/4 cup milk
- 1/2 cup powdered sugar for dusting
Instructions
- In a large bowl, whisk together the flour, sugar, and salt.
- Cut in the softened butter using a pastry blender or your fingers until the mixture resembles coarse crumbs.
- In a separate small bowl, whisk the egg, vanilla extract, and milk.
- Add the wet ingredients to the dry ingredients and mix until a soft dough forms. Do not overmix.
- Wrap the dough in plastic wrap and chill for 30 minutes.
- Preheat your oven to 350 degrees Fahrenheit (175 degrees Celsius). Line baking sheets with parchment paper.
- Roll the dough out on a lightly floured surface to about 1/4 inch thickness.
- Use cookie cutters to cut out desired shapes.
- Place cookies on the prepared baking sheets, about 1 inch apart.
- Bake for 10 to 12 minutes, or until the edges are lightly golden.
- Let the cookies cool on the baking sheets for 5 minutes before transferring them to a wire rack to cool completely.
- Once cool, dust generously with powdered sugar.
Notes
- You can add lemon or orange zest to the dough for extra flavor.
- Store the cookies in an airtight container at room temperature for up to one week.
- Prep Time: 20 min
- Cook Time: 12 min
- Category: Dessert
- Method: Baking
- Cuisine: Italian
Nutrition
- Serving Size: 1 cookie
- Calories: 110
- Sugar: 7
- Sodium: 45
- Fat: 5
- Saturated Fat: 3
- Unsaturated Fat: 2
- Trans Fat: 0
- Carbohydrates: 15
- Fiber: 0
- Protein: 2
- Cholesterol: 20
Keywords: Italian Christmas Cookies, Festive Cookies, Holiday Baking, Traditional Italian Sweets, Christmas Dessert