Halloween is all about the fun, right? And honestly, what’s more fun than a dessert that looks totally gross but tastes absolutely incredible? Forget complicated baking for one night; we are keeping this simple and letting the creepy factor shine! I remember one year, my nephew, who was about seven, swore up and down that the gummy worms were trying to escape his cup. He loved helping me crush the cookies until they looked exactly like potting soil. That memory alone makes this recipe a yearly must-do for me. We are diving into the best, easiest, no-bake dessert imaginable: the Spooky Halloween Dirt Cake Cups Recipe A Tasty Treat. Get ready to impress everyone without even turning on the oven!
Why This Spooky Halloween Dirt Cake Cups Recipe A Tasty Treat Shines
I love this dessert because it lets you focus on the spooky fun instead of wrestling with tricky baking times. It just comes together so fast, and honestly, the visual payoff is huge for how little effort you put in. Trust me, this Spooky Halloween Dirt Cake Cups Recipe A Tasty Treat is going straight to the top of your favorites list.

-
No Bake Convenience
Seriously, zero oven required! Since Halloween week is always chaos, whipping up a whole batch of these while the turkey defrosts or while you’re decorating pumpkins is a breeze. You can spend your time on the creepy details instead of worrying about cake collapsing.
-
Perfectly Portioned Spooky Halloween Dirt Cake Cups Recipe A Tasty Treat
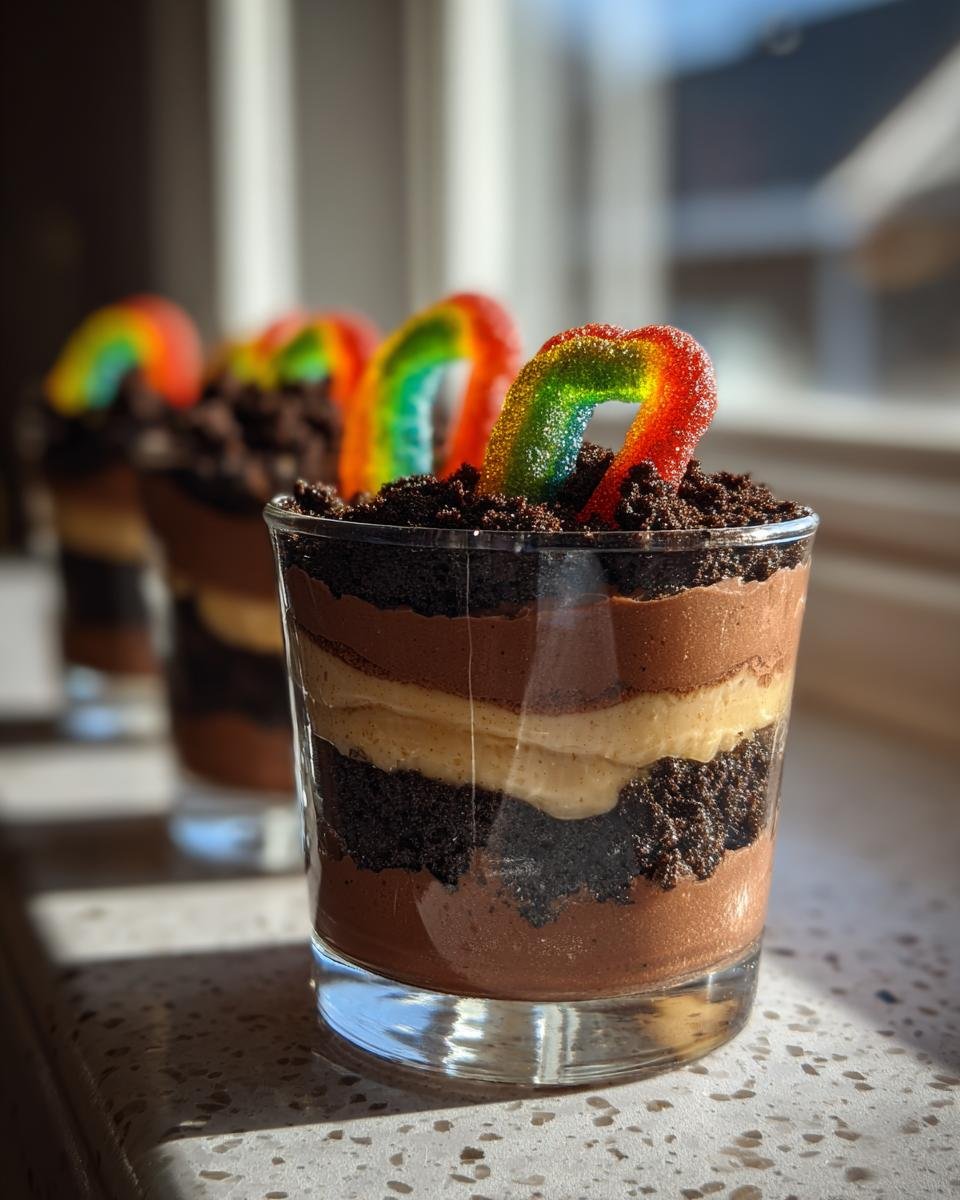
Putting everything into individual cups is genius, honestly. It looks so cute lined up on a platter, and nobody has to risk messing up a giant cake while trying to serve themselves. Plus, you get that perfect scoop of cream layer, dirt layer, and maybe two gummy worms every single time.
-
Kid-Friendly Assembly
This is the best part for the little goblins running around your house. Hand them the crushed cookies and let them go to town layering up the ‘dirt.’ They are going to feel like they made the grossest, best dessert ever, and you get an easy cleanup!
Gathering Ingredients for Your Spooky Halloween Dirt Cake Cups Recipe A Tasty Treat
Okay, let’s get down to business! The best part about this recipe is that you probably already have most of this stuff hiding in your pantry. We aren’t using anything fancy here, which is why it whips up so fast. These simple components create that amazing creamy filling that holds the entire haunted landscape together. If you are looking for other easy dessert components, check out my irresistible Oreo cheesecake recipe for inspiration, but for now, grab your list!
Creamy Filling Components
This base is where the flavor explosion happens before we bury it in cookie goodness. Make sure your dairy is temperate so it mixes smoothly—nobody wants lumpy cream cheese when scooping into this spooky treat!
- 8 ounces of cream cheese; you absolutely must let this soften up first!
- 1 cup of unsalted butter, also softened, just like the cream cheese.
- 1 cup of powdered sugar—don’t substitute this, we need the fine texture!
- 1 container (12 ounces) of frozen whipped topping; make sure it’s fully thawed, but don’t whip it again!
Chocolate Pudding Base
This adds the deep chocolate flavor to the filling, making it taste amazing, not just look like dirt. Only use instant pudding here; the stovetop kind just won’t set right when mixed with the dairy and fats.
- Two packages (3.9 ounces each) of instant chocolate pudding mix.
- 3 cups of cold milk. Seriously, make sure it’s cold or the pudding won’t thicken up properly.
The ‘Dirt’ and Garnish for Spooky Halloween Dirt Cake Cups Recipe A Tasty Treat
This is the fun finale for our Spooky Halloween Dirt Cake Cups Recipe A Tasty Treat! The crushed cookies are the star here, giving us that perfect crumbly texture that fools everyone.
- 1 package (14.3 ounces) of your favorite chocolate sandwich cookies—that means Oreos or something similar! We need a few cups crushed.
- Gummy worms, obviously! You need a few wigglers peeking out of the top layer.
Step-by-Step Instructions for Your Spooky Halloween Dirt Cake Cups Recipe A Tasty Treat
This is where our no-bake magic really happens! It’s all about layering, and trust me, if you can stir, you can nail this recipe. I highly recommend grabbing your electric mixer for the first few steps—unless you want ridiculously tired arms—but the rest you’ll need to do gently by hand so we don’t deflate all that whipped topping goodness. If you’re looking for another easy layering challenge that sets up nicely, you should check out this Funfetti Oreo Icebox Cake while you wait for things to firm up!
Preparing the Cream Cheese Layer
First things first, we need that luxurious, lump-free base. Grab your softened cream cheese and butter. Beat them together until they get really smooth and creamy. Then, slowly rain in the powdered sugar while the mixer is running. Once that’s blended, you gently fold in your fully thawed whipped topping. Don’t overmix this part! You want stiff peaks in the topping, and folding keeps it airy. Set this bowl aside for a minute.
Making the Chocolate Pudding Filling
Next up is the chocolate layer. In a totally separate bowl, whisk the two packages of instant chocolate pudding mix with the 3 cups of cold milk. You need to whisk this nonstop for about two full minutes—that’s critical for setting up. After that, just let it stand on the counter. It needs a good five minutes to thicken up before you move on, so don’t skip this waiting game!
Combining Mixtures and Crushing Cookies
Now, gently combine! Take that pudding mixture and gently fold it into the cream cheese mixture. I mean *gently*—think folding clouds together. Once it’s mostly combined, it’s time for the dirt! Crush your chocolate sandwich cookies until they look like fine, rich soil. My secret tip? If you use a food processor, pulse it just a few times. If you process it until it’s fine powder, it won’t look like dirt! You want some tiny textures left in there.
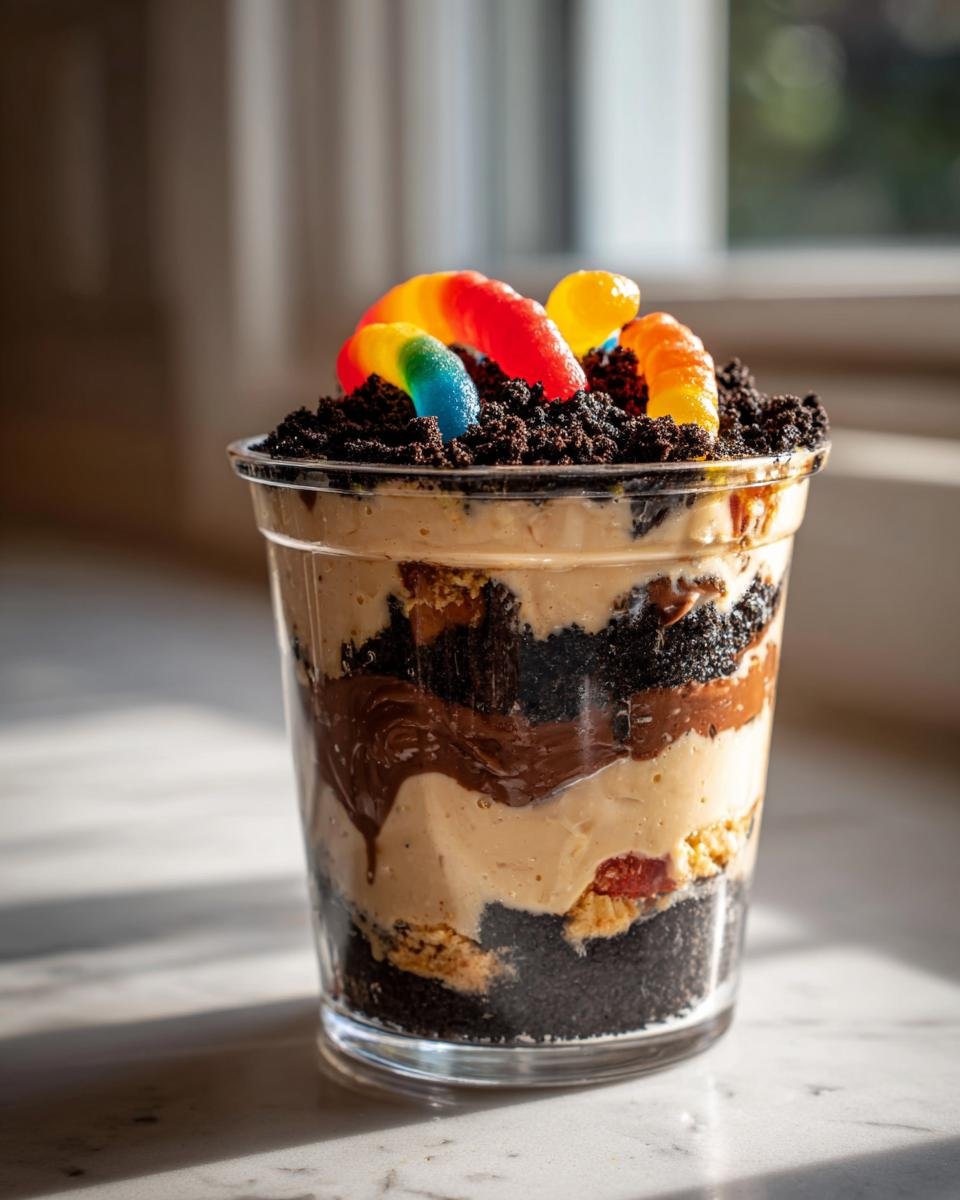
Assembling the Spooky Halloween Dirt Cake Cups Recipe A Tasty Treat
Time to build! Spoon or pipe that creamy chocolate mixture into your individual cups. Then, grab those crushed cookies and make a thick layer right on top. That’s the first layer of dirt! Repeat the layers again: cream, then cookies. Make sure you save a handful of the finest crumbs to sprinkle over the top layer. Finally, for the grand finale of this Spooky Halloween Dirt Cake Cups Recipe A Tasty Treat, stick a couple of gummy worms right into that top layer so they look like they are crawling out. Perfection!

Tips for Success with Your Spooky Halloween Dirt Cake Cups Recipe A Tasty Treat
Look, just following the steps is great, but knowing the little secrets is what makes you look like a dessert wizard! When you’re working on this Spooky Halloween Dirt Cake Cups Recipe A Tasty Treat, paying attention to ingredient state makes all the difference between a creamy dream and a lumpy mess. I’ve definitely learned this the hard way when I tried to rush things before a party!
Achieving the Right Consistency
The single easiest way to ruin the filling is using cold cream cheese or butter. Put your cream cheese and butter on the counter at least an hour before you plan on mixing. They need to be truly soft—I mean, you should be able to press your finger into the stick of butter easily. If you try to beat cold fats with sugar, you end up with little hard bits throughout your filling, and nobody wants to bite into a cold chunk of cream cheese in their “dirt.” It just ruins the smooth texture we are aiming for!
Cookie Crumb Texture for Spooky Halloween Dirt Cake Cups Recipe A Tasty Treat
This one really separates the professionals from the amateurs when it comes to this Spooky Halloween Dirt Cake Cups Recipe A Tasty Treat. We don’t want powder, but we also don’t want whole chunks of cookie shell either. If you use the food processor, pulse it three or four times, then stop and check. You want a mix where you see varying sizes—some fine dust and some small, slightly jagged pieces. That variation mimics real earth or mulch much better than a uniform powder. If you are using a bag and a rolling pin, try to press down gently rather than smashing with all your might. A little texture variation makes the “dirt” so much more fun to eat!
Storage and Make-Ahead Options for This Spooky Halloween Dirt Cake Cups Recipe A Tasty Treat
This is honestly the best part about the Spooky Halloween Dirt Cake Cups Recipe A Tasty Treat—it’s a massive stress reliever for party day! You can totally get ahead of the game here. Seriously, don’t even think about mixing these the day of the party unless you absolutely have to.
The short answer is yes, you can make these ahead! I usually put mine together the day before the big ghoul bash. You need to make sure they are covered up tight, though. I grab a sheet of plastic wrap for each cup and press it right down onto the top layer of ‘dirt.’ This keeps the cookies from getting that weird, stiff, damp layer on top, which ruins the texture.
If you store them covered tightly in the refrigerator, they are honestly perfect for up to 24 hours. If you push it to two days, they are still totally fine to eat, but the cookie crunch might soften up a tiny bit. That’s not necessarily a bad thing if you prefer a softer dessert base for your Spooky Halloween Dirt Cake Cups Recipe A Tasty Treat, but for maximum ‘dirt’ texture, aim for overnight chilling. They taste even better the next day once all those flavors have mingled!
Serving Suggestions for Your Spooky Halloween Dirt Cake Cups Recipe A Tasty Treat
So, you’ve got your dirt cups assembled, and the gummy worms are wiggling impressively. Awesome! But why stop there? Halloween is a holiday for over-the-top presentation, and these Spooky Halloween Dirt Cake Cups Recipe A Tasty Treat just beg for a little extra flair on top of that crushed cookie layer. I love adding little visual surprises that make people lean in for a closer look. These aren’t just desserts; they’re part of the centerpiece!
If you are looking for more incredibly easy, spooky-themed snacks to round out your party spread, you have to check out my recipe for Halloween chocolate-covered pretzels. They pair perfectly with these cups because they offer that necessary salty crunch!
Here are a few other ideas I use every year to amp up the creep factor:
- Chocolate Rocks: Forget the gummy worms for a minute and toss on a few candy-coated chocolate rocks right onto the dirt. They look exactly like little pebbles, and they add a nice solid crunch.
- Candy Corn Pebbles: This is a simple one, but it works wonderfully. Take a small handful of candy corn (if you dare!) and just crush them slightly—not to dust, but just to break them into tiny, irregular bits. Sprinkle these orange, yellow, and white bits over the top layer of dark cookie dirt; it looks like disturbed, funky soil.
- Oreo Crumble Border: If you are using clear glass cups, sometimes I leave a thin border of the glass free above the cream layer, then press extra fine cookie crumbs right against the glass wall before adding the main layer of filling. It makes the ‘dirt’ look thicker and darker around the edges, giving it a cool depth illusion.
No matter how you decorate them, remember that the Spooky Halloween Dirt Cake Cups Recipe A Tasty Treat is supposed to look delightfully messy. Have fun with it!
Frequently Asked Questions About Spooky Halloween Dirt Cake Cups Recipe A Tasty Treat
It’s funny how everyone asks the same few things when they try this recipe for the first time. It is so simple, but because we’re playing with texture (creamy filling vs. crunchy cookies), people have understandable questions! I’m happy to clear up any confusion so your Spooky Halloween Dirt Cake Cups Recipe A Tasty Treat turns out absolute perfection.
Can I use homemade whipped cream instead of frozen whipped topping in this dirt cake?
Yes, you totally can, but you have to be careful! If you whip your own heavy cream to stiff peaks, it will certainly work in the filling. However, the stabilization from the pre-whipped topping usually means the cups hold their shape better over a longer time. Homemade whipped cream might start weeping or releasing liquid after about 12 hours in the fridge, which would make your cookie layer soggy much sooner. If you do use fresh cream, make sure it’s incorporated very gently, and try to serve within 8 to 10 hours for the best texture contrast.
What is the best type of cookie to use for the ‘dirt’ in the Spooky Halloween Dirt Cake Cups Recipe A Tasty Treat?
Hands down, the classic chocolate sandwich cookies—you know, the ones with the white filling—are the champion here for the Spooky Halloween Dirt Cake Cups Recipe A Tasty Treat. Keeping the white filling in when you crush them gives the “dirt” color variety, which looks more realistic! If you absolutely have to substitute, you could use plain chocolate wafers, but you might need to add a tiny bit more sugar to the filling, as the creme filling does add hidden sweetness to the ‘dirt’ layer.
How long can these pudding cups stay refrigerated?
I mentioned this a bit in the storage section, but let’s make it crystal clear! For that ideal texture—super creamy filling combined with that perfect, slightly softened but still crumbly cookie layer—you want to eat them within 24 hours. If you need to make them further ahead, they are definitely safe for up to 36 hours. Any longer, and that liquid starting to release from the pudding and cream cheese just makes the cookie dirt turn a little too mushy for my taste. Nobody likes soggy dirt!
Estimated Nutritional Snapshot for Spooky Halloween Dirt Cake Cups Recipe A Tasty Treat
Okay, let’s be real for a second. When you are eating something that looks this delicious and tastes this delightfully strange, you aren’t exactly reaching for a calculator, right? But for those of you who like to keep an eye on things, I’ve pulled together the estimated nutritional breakdown for one of these amazing Spooky Halloween Dirt Cake Cups Recipe A Tasty Treat servings.
Remember, I’m just a home cook playing with pudding and cookies, not a certified lab! So, these numbers are just a ballpark estimate based on the ingredients listed. That said, this treat is definitely rich, considering the butter and cream cheese, but totally worth the indulgence for a spooky celebration!
Here’s a quick look at what you’re getting in one of these single-serving cups:
- Serving Size: 1 cup
- Calories: About 450 (A decent chunk, but it’s party food!)
- Fat: Roughly 28g total fat, which includes about 15g of saturated fat. That’s where the richness comes from!
- Carbohydrates: Around 45g. Lots of sugar in the pudding and cookies, naturally.
- Protein: About 5g per serving.
- Sugar: You’re looking at about 40g of sugar. Halloween magic burns off those calories later, I promise!
- Cholesterol: Estimates put this around 55mg.
Don’t stress too much over these numbers, though. The joy of making an awesome Spooky Halloween Dirt Cake Cups Recipe A Tasty Treat for friends and family far outweighs worrying about a few extra grams of sugar when you’re having fun!
Share Your Spooky Halloween Dirt Cake Cups Recipe A Tasty Treat Experience
Whew! We made it through the dirt, the cream, and the creepy worms! Now that you’ve whipped up this incredible Spooky Halloween Dirt Cake Cups Recipe A Tasty Treat, I absolutely need to hear about it. The best part of sharing my crazy recipes is seeing what you all do with them. Did you go all out with the gummy worms? Did the kids make a total mess hauling the cookie crumbs?
Please, please, please rate this recipe if you loved how easy and delicious it was! Five stars for a messy but marvelous Halloween dessert? I hope so! Drop your ratings right below and let me know in the comments section how the assembly went at your house. Did you try any of my crazy serving suggestions, or did you come up with something even spookier?
And if you snapped a picture of your beautifully layered, wiggly dessert cups—I want to see them! Tag me on social media or feel free to send them my way through the contact page. I love seeing your spooky creations and feature reader photos all the time! Don’t be shy; sharing our fun cooking victories helps everyone else feel confident making a batch of their own Spooky Halloween Dirt Cake Cups Recipe A Tasty Treat next year. Happy Haunting, and happy eating!
Print
Spooky Halloween Dirt Cake Cups
- Total Time: 25 min
- Yield: 8 servings 1x
- Diet: Vegetarian
Description
A simple, tasty dessert made to look like dirt, perfect for Halloween.
Ingredients
- 1 package (8 ounces) cream cheese, softened
- 1 cup unsalted butter, softened
- 1 cup powdered sugar
- 1 container (12 ounces) frozen whipped topping, thawed
- 2 packages (3.9 ounces each) instant chocolate pudding mix
- 3 cups cold milk
- 1 package (14.3 ounces) chocolate sandwich cookies (like Oreos)
- Gummy worms for garnish
Instructions
- Beat the softened cream cheese and butter together until smooth.
- Gradually add the powdered sugar and mix until fully combined.
- Fold in the thawed whipped topping. Set aside.
- In a separate bowl, whisk together the instant chocolate pudding mix and cold milk for two minutes. Let the pudding sit for five minutes to thicken.
- Gently fold the pudding mixture into the cream cheese mixture.
- Crush the chocolate sandwich cookies in a food processor or by placing them in a sealed bag and crushing them with a rolling pin until they resemble fine dirt. Reserve a small amount for topping.
- Spoon or pipe the cream cheese mixture into individual serving cups.
- Layer the crushed cookies over the cream cheese mixture in each cup.
- Top with a final layer of crushed cookies.
- Insert a few gummy worms into the top layer of ‘dirt’ before serving.
Notes
- You can make these cups a day ahead of time; cover and refrigerate.
- Use any small, clear cup or jar for the individual servings.
- If you do not have a food processor, place cookies in a sturdy plastic bag and crush them with a heavy object.
- Prep Time: 25 min
- Cook Time: 0 min
- Category: Dessert
- Method: No Bake
- Cuisine: American
Nutrition
- Serving Size: 1 cup
- Calories: 450
- Sugar: 40
- Sodium: 350
- Fat: 28
- Saturated Fat: 15
- Unsaturated Fat: 13
- Trans Fat: 0.5
- Carbohydrates: 45
- Fiber: 2
- Protein: 5
- Cholesterol: 55
Keywords: Halloween, dirt cake, pudding cups, no bake dessert, chocolate, cookies, spooky treat