
No heading needs to be written for the introduction. Oh my goodness, friends, have you ever had one of those days where you just *need* something sweet, but the thought of turning on the oven makes you want to curl up and cry? Or maybe your oven decided to stage a protest in the middle of a heatwave? Been there, done that, got the melted chocolate stains on my favorite apron! Well, guess what? I’m here to tell you, No Oven? No Problem! Try These 4 No-Bake Oreo Desserts! Seriously, these recipes are my absolute go-to when I need a delicious treat without any fuss. I’ve been whipping up simple, scrumptious desserts for years, and these no-bake wonders are some of my proudest creations. They’re perfect for those scorching summer days, unexpected potlucks, or just when you’re feeling a little lazy (no judgment here, we all have those days!).

Why You’ll Love These 4 No-Bake Oreo Desserts
Okay, so why are these no-bake Oreo desserts my absolute favorite? Well, besides the obvious fact that they involve Oreos (hello, deliciousness!), they truly are a game-changer. They’re incredibly easy, super fast, and you don’t even need to preheat an oven! Seriously, that’s a win in my book, especially when it’s hot out or you’re just not feeling like a big baking project. Plus, there’s a little something for everyone here, whether you’re into creamy delights, bite-sized truffles, or a classic icebox cake. You’ll wonder how you ever lived without them!
No Oven? No Problem! The Ultimate Convenience
This is the big one, right? The “no oven” part means these treats are totally accessible, no matter your kitchen setup. Live in a dorm? Got a tiny apartment? Or maybe your oven’s just being difficult? No sweat! These recipes are your new best friends. They’re perfect for bringing to a friend’s house or whipping up on a whim when that dessert craving hits.
Quick and Easy Sweet Treats
Let’s be real, sometimes you just need dessert, and you need it *now*. That’s where these come in! Most of the “work” here is just mixing and chilling. There’s minimal fuss, minimal cleanup, and you’ll be enjoying a decadent, homemade treat in no time. They’re a lifesaver for last-minute gatherings or when you just want to treat yourself without spending hours in the kitchen.
Essential Ingredients for Your No Oven? No Problem! Desserts
Alright, let’s talk ingredients! One of the best things about these no-bake wonders is that you don’t need a huge grocery list or fancy, hard-to-find items. We’re keeping it simple and delicious, just like I like it! Most of these you probably already have lurking in your pantry or fridge. We’ll be using a mix of familiar staples to create some seriously magical desserts. Precision matters here, so pay attention to those measurements!
The Core Oreo Components
First up, the star of the show: Oreos! You’ll need a big package, specifically one of those 14.3-ounce beauties. We’re going to be dividing these up for different purposes, so don’t just crush them all at once! Some will be crushed super fine for crusts and truffles, while others will stay whole for that amazing icebox cake. Trust me, every single Oreo has its moment to shine in these recipes!
Dairy and Sweeteners
Next, we move onto the creamy, dreamy stuff that makes these desserts so luscious! Grab an 8-ounce block of cream cheese – make sure it’s softened, that’s super important for a smooth mix. You’ll also need a container of whipped topping (like Cool Whip!), an 8-ounce one, thawed and ready to go. For the pudding, we’ll use instant chocolate pudding mix and some cold milk. And don’t forget the heavy cream for that glorious icebox cake; whip it up with a bit of granulated sugar. For sweetness, we’ve got powdered sugar for that smooth texture in a few of the recipes. Simple, right?
How to Prepare Your No Oven? No Problem! Oreo Desserts
Alright, friends, this is where the magic happens! Don’t be intimidated by four recipes; we’re breaking it down step-by-step, and I promise you, it’s all super straightforward. The biggest “work” here is often just chilling time, which is perfect because it means less work for you and more time to anticipate that first delicious bite! Just follow along, and you’ll be a no-bake pro in no time.
Building the Oreo Crust
First things first, let’s get that amazing Oreo crust ready! Grab about 30 of your Oreo cookies and crush them up into fine crumbs. I usually throw them in my food processor for this, but a Ziploc bag and a rolling pin work just as well for a little stress relief! Once they’re nice and crumbly, mix them with your melted butter until everything’s well combined. Then, press that delicious mixture firmly into a 9-inch pie plate or an 8×8 inch pan. Pop it in the fridge for about 15 minutes to chill while you get the filling ready.
Crafting the Oreo Delight
This is probably my most requested recipe, and for good reason – it’s pure bliss! First, in a medium bowl, beat your softened cream cheese with the powdered sugar and vanilla extract until it’s super smooth and creamy. Next, gently fold in about half of your thawed whipped topping. Spread this creamy goodness evenly over your chilled Oreo crust. Now, for the chocolate layer: whisk together your instant chocolate pudding mix and cold milk for about 2 minutes. It’ll thicken up pretty quickly, so don’t be alarmed! Spread that over the cream cheese layer. Finally, top it all with the rest of your whipped topping and sprinkle with some extra crushed Oreos or mini chocolate chips. Into the fridge it goes for at least 4 hours, but honestly, overnight is even better!
Rolling Out Oreo Truffles
These little bites of heaven are dangerously addictive! For truffles, you’ll want to finely crush about 36 Oreo cookies. Again, a food processor is your best friend here. In a bowl, combine those finely crushed Oreos with 8 ounces of softened cream cheese. Mix it really well until it forms a nice, pliable dough – you might need to get your hands in there for this part! Once combined, roll the mixture into 1-inch balls. Place them on a parchment-lined baking sheet and chill for at least 30 minutes. If you’re feeling fancy, you can dip them in melted chocolate or white chocolate and add some sprinkles. Chill them again until they’re firm, and try not to eat them all at once!
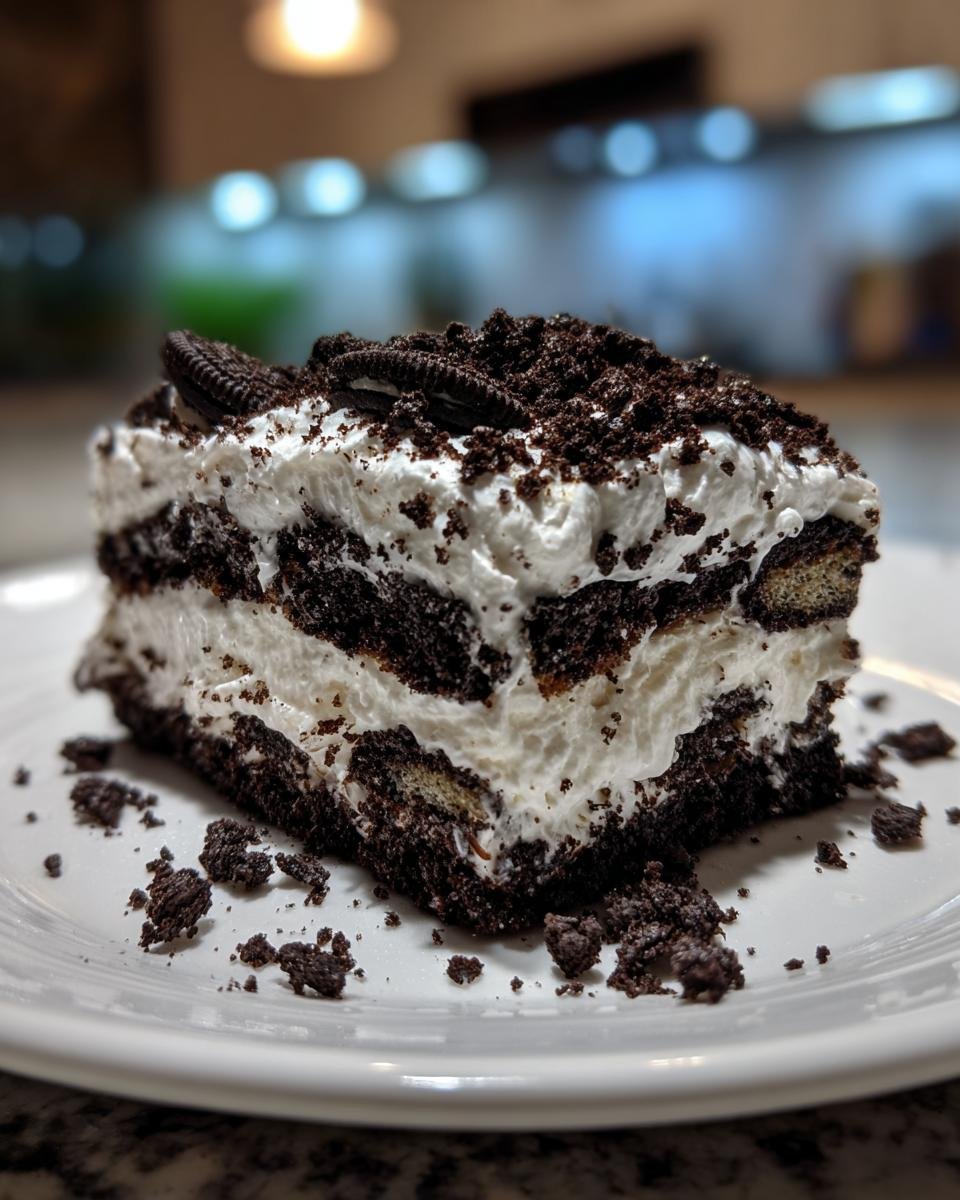
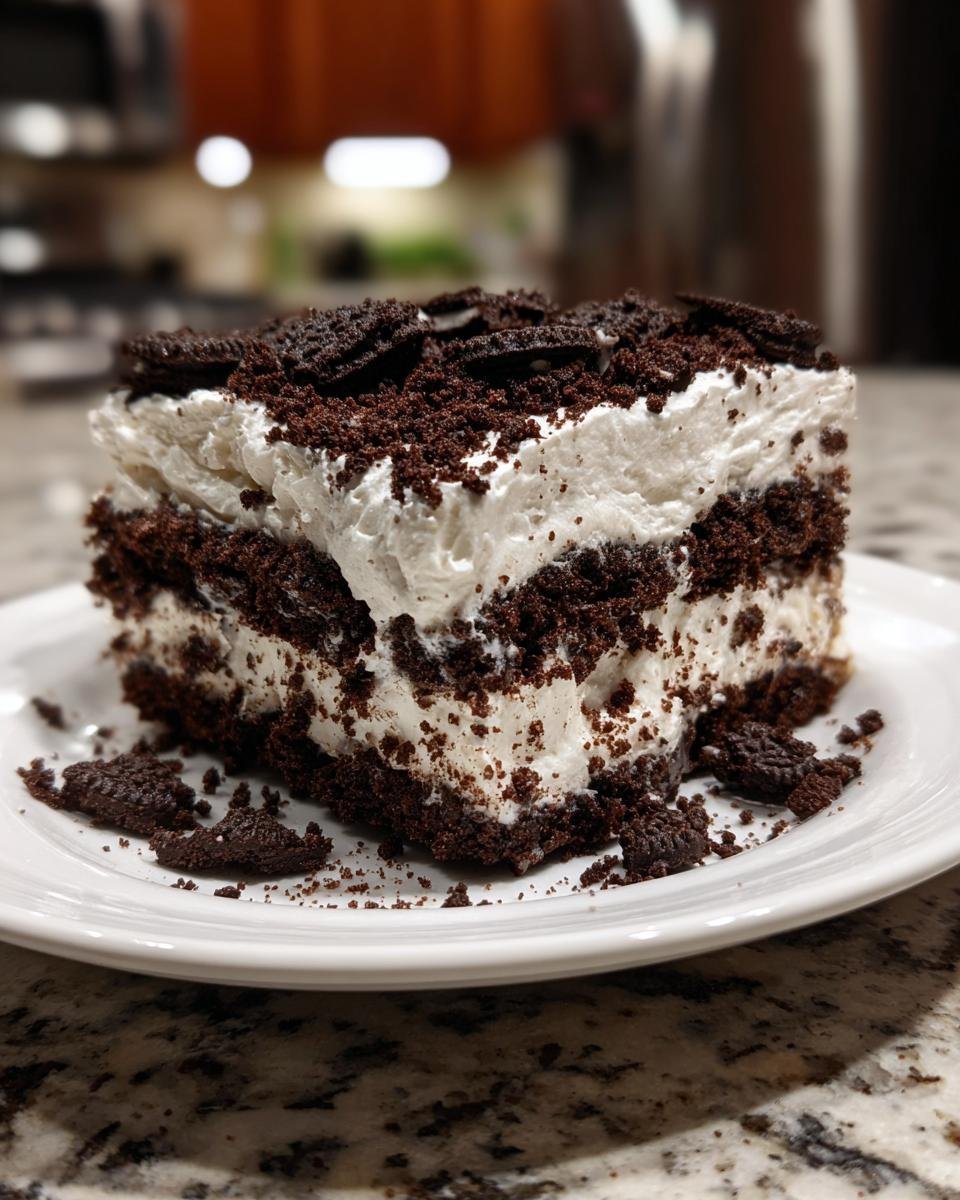
Assembling the Oreo Icebox Cake
This cake is deceptively simple and incredibly impressive. You’ll need a 9×13 inch pan for this one. Start by arranging a single layer of whole Oreo cookies on the bottom of the pan. Don’t worry if there are a few gaps, it’ll all come together! Now, in a large bowl, whip your heavy cream with the granulated sugar until beautiful, stiff peaks form. This is the “cake” part, essentially! Spread half of that glorious whipped cream evenly over your first layer of Oreos. Add another layer of whole Oreos on top of the whipped cream, then spread the remaining whipped cream over those. For the grand finale, crush the remaining Oreos and sprinkle them generously over the top. Now, the hardest part: chilling! This absolutely *needs* at least 4 hours, but overnight is truly the way to go for the cookies to soften into that perfect cake-like texture.
Tips for Success: Making No Oven? No Problem! Desserts Perfect
You’ve got the recipes, now let’s talk about those little tricks that make these no-bake Oreo desserts go from “good” to “OMG, you HAVE to try this!” These aren’t complicated tips, just small things that make a big difference in texture, flavor, and overall deliciousness. Trust me, these little nuggets of wisdom will make your no-bake journey even more delightful. Ready to become a no-bake wizard?
Achieving the Right Texture
Texture is everything in these desserts, especially since we’re not baking them! Make sure your cream cheese is softened to room temperature; this is crucial for a smooth, lump-free filling. And don’t skimp on chilling time! Seriously, that’s where the magic happens. The longer they chill, the firmer they get, and the more those flavors meld together. For the icebox cake, overnight chilling is truly the secret to perfectly soft, cake-like Oreos.
Customizing Your No Oven? No Problem! Creations
One of the best parts about these recipes is how easy they are to customize! Want to add a little extra something? Go for it! You could toss in some mini chocolate chips to the Oreo Delight filling, or maybe a sprinkle of flaky sea salt on the truffles for that delicious sweet-and-salty kick. A little peppermint extract in the whipped cream for the icebox cake would be amazing around the holidays, or a dash of orange zest in the cream cheese layer for a bright, fresh flavor. Don’t be afraid to experiment and make them your own!
Storing Your No Oven? No Problem! Treats
Okay, so you’ve whipped up these amazing no-bake Oreo desserts, and maybe, just maybe, you haven’t devoured them all in one sitting (impressive self-control!). Now, how do you keep them fresh so you can enjoy them for a few more days? Proper storage is key, especially since these are all dairy-based and need to stay nice and cold. Don’t worry, it’s super simple, and I’ve got you covered on the best ways to keep them tasting their best.
Keeping Them Fresh
Since all these delicious treats contain cream cheese, whipped topping, or heavy cream, they absolutely need to be stored in the refrigerator. Make sure to keep them in an airtight container. This prevents them from drying out and absorbing any funky fridge smells. The Oreo Delight, Cheesecake Bites, and Icebox Cake will stay fresh and delicious for about 3-4 days in the fridge. The truffles, thanks to their denser consistency, usually last a bit longer, up to a week. Just make sure they’re always covered!
Frequently Asked Questions About No Oven? No Problem! Oreo Desserts
I know when you’re trying out new recipes, especially ones that are a little different like these no-bake wonders, questions pop up! So, I’ve put together some of the most common questions I get about these kinds of treats. Hopefully, these answers will help clear up any lingering thoughts and make your no-bake experience even smoother!
Can I Make These Ahead of Time?
Absolutely, yes! In fact, most of these no-bake Oreo desserts actually taste *better* the next day. The chilling time isn’t just about setting; it really lets all those yummy flavors meld together. So, whipping them up the night before a party or gathering is a fantastic idea. Just make sure they’re covered well in the fridge!
What If I Don’t Have All the Ingredients?
Sometimes you’re just missing one thing, right? For the whipped topping, if you don’t have a container, you can definitely whip up your own fresh heavy cream with a little sugar. If you’re out of chocolate pudding mix, you could try a vanilla one and mix in some cocoa powder. For the butter, margarine can work in a pinch for the crust, but real butter gives the best flavor. Don’t be afraid to get creative with what you have!
How Long Do These No-Bake Oreo Desserts Last?
These delicious no-bake treats are best enjoyed within 3-4 days when stored properly in an airtight container in the refrigerator. The Oreo truffles, being a bit denser, can often last up to a week. Beyond that, they might start to lose some of their fresh texture and flavor, so make sure to gobble them up!
Nutritional Information Disclaimer
Just a little heads-up about the nutritional information for these delicious desserts! Since these recipes use different ingredients and brands can vary, any nutritional values you might find are just estimates. Things like serving sizes, calories, and sugar content can change depending on the exact products you use. So, think of it as a general guide, not a super precise measurement!
Share Your No Oven? No Problem! Creations
So, there you have it, folks! Four incredibly easy, totally delicious no-bake Oreo desserts that are sure to be a hit. I absolutely love seeing your kitchen adventures, so please, please, please don’t be shy! If you whip up any of these recipes, I’d be thrilled if you left a comment below to let me know how it went. And if you share your creations on social media, tag me! I can’t wait to see your “No Oven? No Problem!” masterpieces!
Print
No Oven? No Problem! 4 Indulgent Oreo Treats
- Total Time: 240 minutes
- Yield: Multiple servings, varies by recipe
- Diet: Vegetarian
Description
Four easy no-bake Oreo dessert recipes perfect for when you don’t have an oven.
Ingredients
- 1 (14.3-ounce) package Oreo cookies, divided
- 1/2 cup (1 stick) unsalted butter, melted
- 8 ounces cream cheese, softened
- 1/2 cup powdered sugar
- 1 teaspoon vanilla extract
- 1 (8-ounce) container whipped topping, thawed
- 1 (3.9-ounce) package instant chocolate pudding mix
- 2 cups cold milk
- 1 cup mini chocolate chips
- 1 (14-ounce) can sweetened condensed milk
- 1/2 cup lemon juice
- 2 cups heavy cream
- 1/4 cup granulated sugar
Instructions
- For Oreo Crust: Crush 30 Oreo cookies into fine crumbs. Mix with melted butter. Press into a 9-inch pie plate or 8×8 inch pan. Chill for 15 minutes.
- For Oreo Delight: Beat cream cheese, powdered sugar, and vanilla until smooth. Fold in half of the whipped topping. Spread over the chilled crust.
- Whisk instant pudding mix and cold milk for 2 minutes until thickened. Spread over the cream cheese layer.
- Top with remaining whipped topping and sprinkle with remaining crushed Oreos or mini chocolate chips. Chill for at least 4 hours.
- For Oreo Truffles: Finely crush 36 Oreo cookies. Mix with 8 ounces softened cream cheese until well combined.
- Roll mixture into 1-inch balls. Chill for 30 minutes.
- Dip truffles in melted chocolate or white chocolate, if desired. Decorate with sprinkles. Chill until firm.
- For Oreo Cheesecake Bites: Crush 20 Oreo cookies. Set aside 1/4 cup for topping.
- In a bowl, combine 8 ounces softened cream cheese, 1/2 cup powdered sugar, and 1 teaspoon vanilla extract. Beat until smooth.
- Fold in crushed Oreos. Drop by spoonfuls onto a parchment-lined baking sheet. Chill for 1 hour.
- For Oreo Icebox Cake: In a 9×13 inch pan, arrange a single layer of whole Oreo cookies.
- In a large bowl, whip 2 cups heavy cream with 1/4 cup granulated sugar until stiff peaks form.
- Spread half of the whipped cream over the Oreo layer. Add another layer of Oreos.
- Spread remaining whipped cream over the second Oreo layer. Crush remaining Oreos and sprinkle on top. Chill for at least 4 hours or overnight.
Notes
- You can use a food processor to crush the Oreos for a finer crumb.
- Adjust sweetness to your liking for all recipes.
- These desserts are best served chilled.
- Store leftovers in an airtight container in the refrigerator.
- Prep Time: 60 minutes
- Cook Time: 0 minutes
- Category: Dessert
- Method: No-Bake
- Cuisine: American
Nutrition
- Serving Size: Varies by recipe
- Calories: Varies by recipe
- Sugar: Varies by recipe
- Sodium: Varies by recipe
- Fat: Varies by recipe
- Saturated Fat: Varies by recipe
- Unsaturated Fat: Varies by recipe
- Trans Fat: Varies by recipe
- Carbohydrates: Varies by recipe
- Fiber: Varies by recipe
- Protein: Varies by recipe
- Cholesterol: Varies by recipe
Keywords: no-bake, Oreo, dessert, easy, quick, chocolate, cream cheese, pudding, truffles, cheesecake, icebox cake