
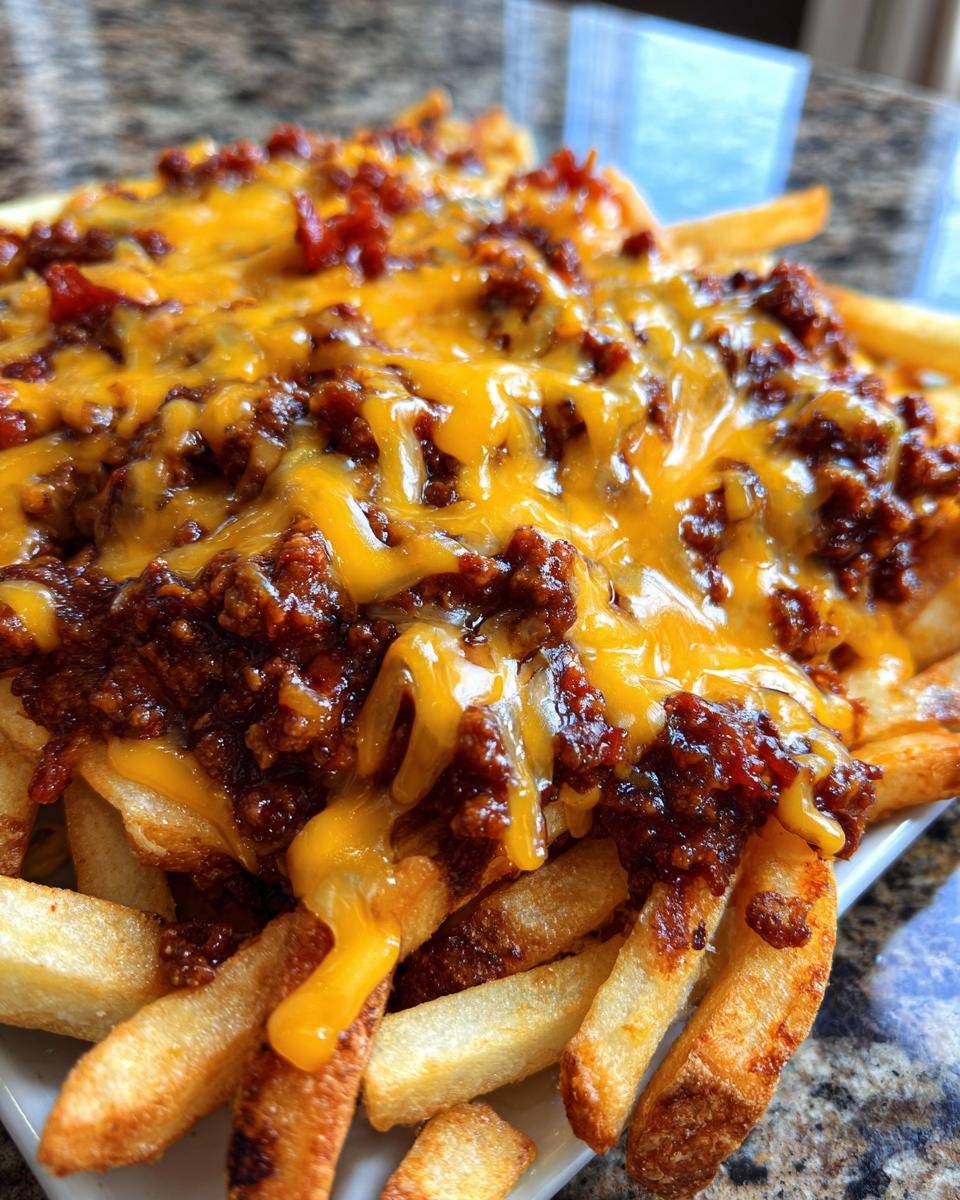
Okay, so picture this: it’s a chilly Saturday night, you’re curled up on the couch, maybe watching a movie, and all you want is something warm, hearty, and utterly delicious. For me, that craving almost always leads to one thing – a big plate of homemade chili cheese fries. Seriously, few things hit the spot quite like that perfect combo of crispy fries, savory chili, and gooey, melted cheese. It’s pure comfort, right?
I’ve been whipping up simple, satisfying recipes for years, and while fancy dishes are fun, there’s something truly special about mastering the classics. And let me tell you, when it comes to chili cheese fries, I’ve got some secrets to share that make them ridiculously easy and unbelievably tasty. Forget those sad, soggy versions you sometimes get out; we’re talking about restaurant-quality deliciousness, made right in your own kitchen with minimal fuss.
This isn’t just a recipe; it’s a promise of pure, unadulterated comfort food bliss. You don’t need a culinary degree, just a love for good food and about 25 minutes. Trust me, once you try these chili cheese fries, you’ll wonder how you ever lived without them!

Why You’ll Love These Amazing Chili Cheese Fries
So, why *these* chili cheese fries? Well, besides tasting absolutely incredible, they’re just so darn practical! I mean, who wants to spend hours in the kitchen when a craving hits? Not me! This recipe is a total lifesaver for those busy weeknights or when you just need a quick, satisfying snack. Plus, they’re always a huge hit, whether it’s just for you or a whole crowd. Trust me, you’ll be making these on repeat!
- Crazy Fast: We’re talking under 30 minutes from start to finish. Seriously!
- Super Simple: Only a handful of ingredients, and the steps are practically foolproof.
- Irresistible Flavor: That perfect salty, savory, cheesy, meaty combo? It’s pure magic.
- Crowd-Pleaser: Great for game day, movie night, or just because!
The Ultimate Comfort Food: Chili Cheese Fries
There’s just something about chili cheese fries, isn’t there? They instantly take me back to childhood, to diner booths and happy memories. They’re the ultimate cozy, no-fuss meal that wraps you in a warm hug. Perfect for a chilly evening, a casual get-together, or when you just need a little pick-me-up. They’re versatile, satisfying, and always, always hit the spot.
Gathering Your Ingredients for Perfect Chili Cheese Fries
Alright, so we’ve talked about *why* you’ll love these chili cheese fries, now let’s get down to the nitty-gritty: the ingredients! This isn’t one of those recipes where you need a dozen obscure spices or fancy gadgets. Nope, we’re keeping it super simple, just like comfort food should be. The beauty here is in the quality of these few key components. Trust me, getting these right is half the battle!
You probably have most of these lurking in your pantry or freezer already. My rule of thumb is always to use ingredients I genuinely enjoy eating on their own, because that flavor will shine through in the final dish. So, grab your shopping list, or just peek into your fridge, and let’s make sure you’ve got everything you need for chili cheese fries perfection.
Essential Components for Delicious Chili Cheese Fries
Here’s what you’ll need to make these incredible chili cheese fries:
- 1 (16-ounce) package frozen french-fried potatoes: This is your base, so pick your favorite! Shoestring fries get super crispy, crinkle-cut are great for scooping up all that chili, or even waffle fries work. Whatever makes your heart sing!
- 1 (15-ounce) can chili without beans: This is where the flavor magic happens. I always go for a good quality beef or turkey chili without beans. You want that rich, meaty texture, not a lot of extra stuff getting in the way. Pick your go-to brand, the one you love the taste of!
- 2 cups shredded Cheddar cheese: Oh, the cheese! Sharp cheddar adds a nice tang, but mild works beautifully too. You can totally buy pre-shredded for convenience, but if you have a block of cheddar, grating it yourself often means it melts even smoother. Just sayin’!
Step-by-Step Guide to Making Chili Cheese Fries
Okay, you’ve got your ingredients ready, your craving is officially raging, and now it’s time for the fun part: actually making these glorious chili cheese fries! Don’t worry, it’s super straightforward. I’m going to walk you through each step, just like I would if you were standing right here in my kitchen. The key is a little bit of patience with the fries, and then everything else just comes together like magic. You’re going to nail this!
Preparing Your Crispy Base for Chili Cheese Fries
First things first, we need to get those fries perfectly crispy. This is crucial, because nobody wants soggy chili cheese fries, right? Trust me on this one!
- Preheat your oven to 400 degrees F (200 degrees C). You want that oven nice and hot so the fries start crisping up immediately. Don’t skip the preheating!
- Arrange your french fries in a single layer on a baking sheet. This is probably the most important part for crispiness. If you pile them up, they’ll steam instead of bake, and that’s a one-way ticket to sad, limp fries. Give them space to breathe! If you have a smaller baking sheet, use two, or bake them in batches.
- Bake for 10 to 12 minutes, or until golden brown and crispy. Keep an eye on them! Ovens can be quirky, so yours might take a minute more or less. You’re looking for that lovely golden color and a firm, crispy texture.
Assembling and Baking Your Cheesy Chili Cheese Fries
While those fries are doing their thing in the oven, let’s get the chili ready. This part moves pretty fast, so you’ll want everything at the ready!
- While the fries are baking, heat your chili. Pour that can of chili without beans into a small saucepan. Warm it over medium heat, stirring occasionally, until it’s hot and bubbly. You want it piping hot so it warms the fries and helps melt that cheese beautifully.
- Remove the fries from the oven. Once they’re golden and crispy, pull them out. Now’s the time to work quickly!
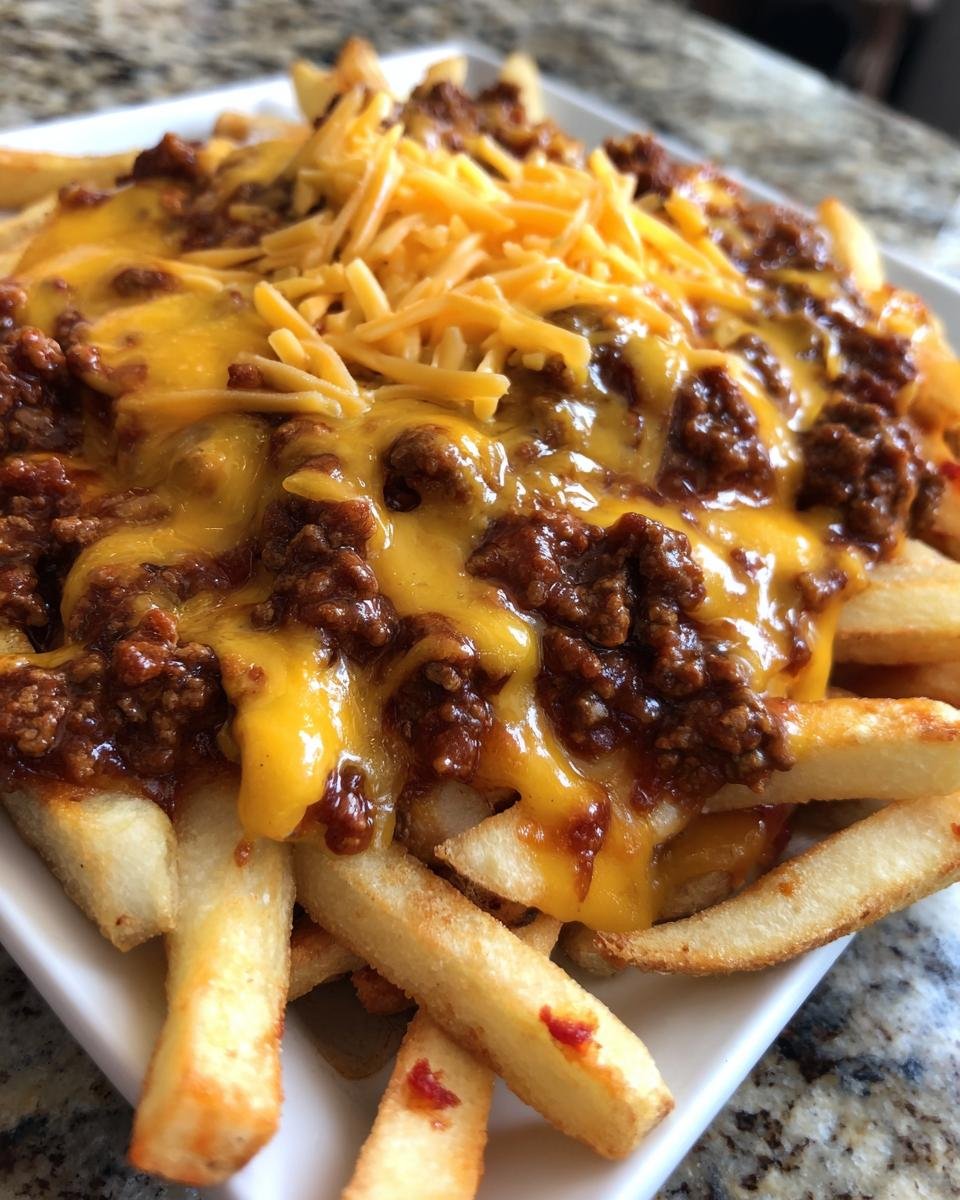
- Immediately top with hot chili and shredded cheese. Spoon that warm chili evenly over your crispy fries. Don’t be shy! Then, sprinkle those two cups of shredded Cheddar cheese all over the top. Make sure every fry gets some love.
- Return to the oven for 3 to 5 minutes. Pop that baking sheet back in the hot oven. This short burst of heat is just to melt that cheese until it’s gloriously bubbly and gooey. Keep an eye on it – you don’t want it to burn!
And that’s it! Pull them out, let them cool for just a minute (they’ll be super hot!), and dig in. Get ready for pure comfort food bliss!
Expert Tips for the Best Chili Cheese Fries
Okay, so you’ve got the basic recipe down, and I know you’re already making some seriously delicious chili cheese fries. But if you want to take them from “really good” to “OMG, I need more of these NOW,” I’ve got a few extra tricks up my sleeve. These are things I’ve learned over countless batches, little tweaks that make a big difference. Trust me, these expert tips will elevate your chili cheese fries game to legendary status!
Customizing Your Chili Cheese Fries
The beauty of chili cheese fries is how easy they are to make your own! While the classic is amazing, don’t be afraid to experiment. My favorite way to jazz them up is to sprinkle some finely diced red onion or a few slices of fresh (or pickled!) jalapeños right after the cheese comes out of the oven. The fresh bite of the onion or the spicy kick of the jalapeño just cuts through the richness so perfectly. And hey, if Cheddar isn’t your only cheese love, try Monterey Jack for extra meltiness, or even a Mexican blend for a little more zing. Have fun with it!
Achieving Peak Crispiness for Your Chili Cheese Fries
Nobody, and I mean nobody, wants soggy chili cheese fries. It’s just a tragedy! So, my biggest tip for avoiding that sad fate is a two-parter. First, *do not* overcrowd your baking sheet when you’re cooking the fries. Give them plenty of space to breathe and get crispy. If they’re piled up, they’ll steam instead of bake, and you’ll end up with limp fries. Second, make sure those fries are truly golden brown and crispy *before* you add the chili and cheese. They’re the foundation, so if they’re not perfect from the start, they won’t hold up under all that deliciousness. A little extra time in the oven for the fries themselves is always worth it!
Frequently Asked Questions About Chili Cheese Fries
I get a lot of questions about these chili cheese fries, and I love it! It tells me you’re just as excited about them as I am. So, I’ve gathered some of the most common ones here to help you troubleshoot, customize, and generally just make the most amazing chili cheese fries possible. If you have another question that isn’t here, please don’t hesitate to ask in the comments below!
Can I Use Fresh Potatoes for Chili Cheese Fries?
You absolutely can use fresh potatoes for chili cheese fries, but it’s a bit more work! You’ll need to peel and cut them into your desired fry shape – shoestring or a thicker cut works well. Then, you’d typically want to soak them in cold water for about 30 minutes to remove excess starch, which helps with crispiness. After that, you’d either deep-fry them until golden and crispy, or toss them with a little oil and bake them at a higher temperature (around 425°F/220°C) for longer, flipping halfway, until they’re perfectly done. It’s a great option if you have the time, but for quick chili cheese fries, frozen is my go-to!
What’s the Best Type of Chili for Chili Cheese Fries?
For these chili cheese fries, I really, really recommend using a canned chili without beans. Why no beans? Because beans can make the whole dish a bit too watery and, frankly, they can get a little mushy on fries. You want that thick, meaty, savory chili texture that clings to the fries and blends with the cheese. As for the type, a classic beef chili is always a winner. You can use a mild one if you prefer, or a spicier version if you like a kick. Just pick your favorite brand that you know tastes good on its own – that’s the key to delicious chili cheese fries!
How Do I Store Leftover Chili Cheese Fries?
Okay, so storing leftover chili cheese fries… this is where it gets a little tricky, honestly. Because of the nature of fries, they tend to get soggy once they’ve been topped and then cooled. If you absolutely have to store them, your best bet is to separate the fries from the chili and cheese before they cool down. Store the chili and cheese mixture in an airtight container in the fridge for up to 3 days. The fries, unfortunately, are best eaten fresh. If you do have leftover assembled fries, you can try reheating them in a hot oven or air fryer to try and crisp them up, but they won’t be quite the same as fresh. My advice? Make just enough to enjoy right away!
Understanding the Nutrition of Your Chili Cheese Fries
I know we’re all about comfort food here, and sometimes that means we’re not thinking too much about the nutritional breakdown, right? But for those who are curious, I’ve included some estimated values for these chili cheese fries. Just a quick heads-up: these numbers are rough estimates! They can totally change based on the specific brands of fries, chili, and cheese you use. Every ingredient choice makes a little difference, so think of these as a general guide, not a strict rulebook!
Share Your Chili Cheese Fries Creations!
So, you’ve made these incredible chili cheese fries, and I bet they’re absolutely amazing! I’d love to hear all about it. Did you add any fun toppings? Did you try a different kind of cheese? Leave a comment below and tell me how they turned out! Or, even better, snap a photo and share it on social media. Tag me, I’d love to see your delicious creations! We can build a whole community of chili cheese fries enthusiasts right here. Happy cooking!
Print
Chili Cheese Fries: Your 25-Min Crave Killer
- Total Time: 25 minutes
- Yield: 4 servings 1x
- Diet: None
Description
Classic comfort food featuring crispy fries loaded with savory chili and melted cheese.
Ingredients
- 1 (16 ounce) package frozen french-fried potatoes
- 1 (15 ounce) can chili without beans
- 2 cups shredded Cheddar cheese
Instructions
- Preheat oven to 400 degrees F (200 degrees C). Arrange french fries in a single layer on a baking sheet.
- Bake 10 to 12 minutes in the preheated oven, or until golden brown.
- While fries are baking, heat chili in a small saucepan over medium heat until hot and bubbly.
- Remove fries from oven and immediately top with hot chili and shredded cheese.
- Return to oven for 3 to 5 minutes, or until cheese is melted and bubbly.
Notes
- For extra flavor, add diced onions or jalapeños after the cheese.
- Use your favorite type of cheese, such as Monterey Jack or a Mexican blend.
- Prep Time: 5 minutes
- Cook Time: 20 minutes
- Category: Appetizer
- Method: Baking
- Cuisine: American
Nutrition
- Serving Size: 1 serving
- Calories: 450
- Sugar: 3g
- Sodium: 850mg
- Fat: 25g
- Saturated Fat: 12g
- Unsaturated Fat: 10g
- Trans Fat: 0g
- Carbohydrates: 35g
- Fiber: 4g
- Protein: 20g
- Cholesterol: 50mg
Keywords: chili cheese fries, fries, cheese, chili, comfort food