Oh man, do I have a lifesaver confession for you! When the doorbell rings unexpectedly on Halloween night and you realize your dessert platter is looking shockingly bare, you need a miracle. This is where my super-fast recipe for Halloween Chocolate Covered Pretzels swoops in to save the entire evening. Seriously, these treats are the easiest, most festive things you’ll ever whip up!
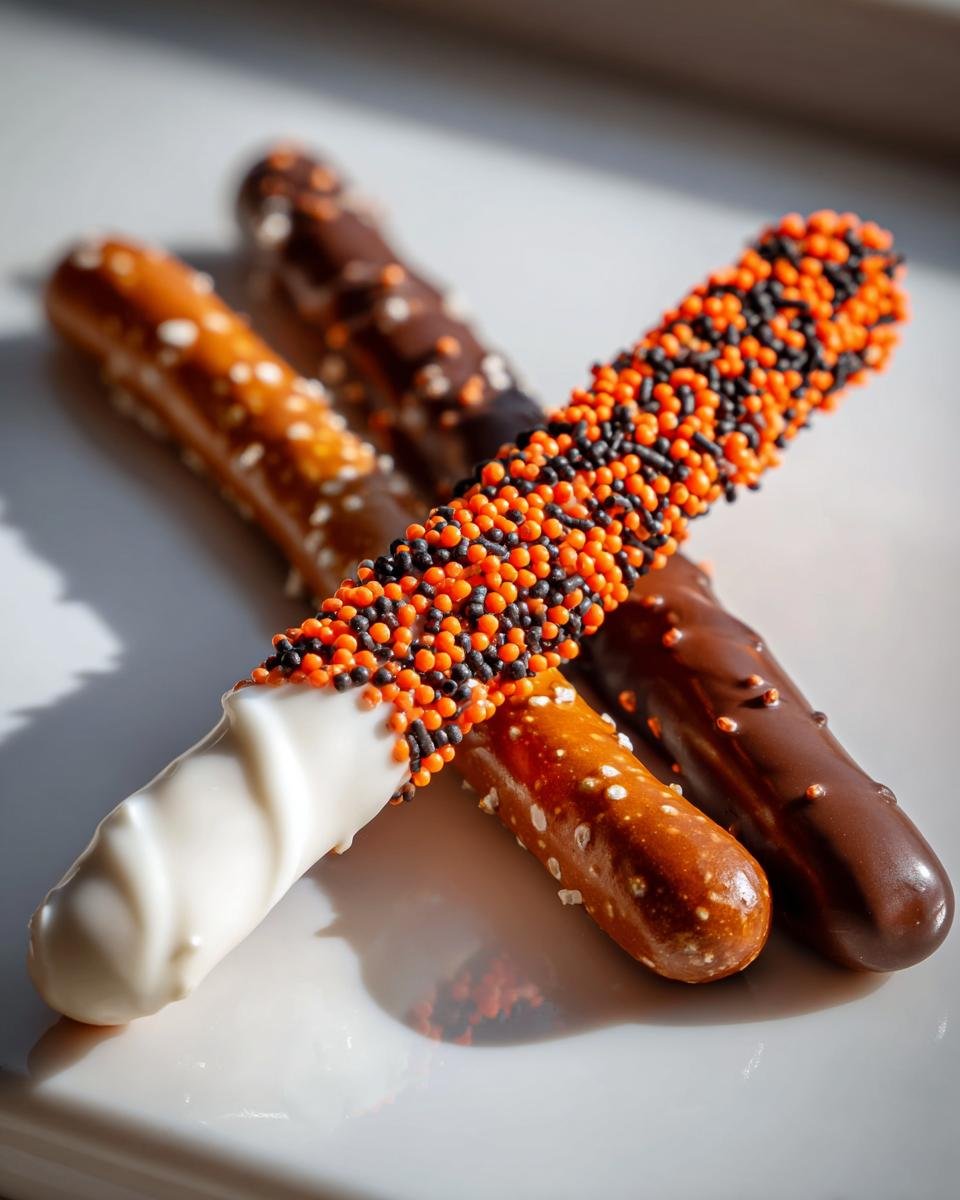
I remember last year, I completely forgot about the school party until 7 PM. Panic! But within 20 minutes, I had these beauties lined up, looking like they took hours. They were gone before the kids even saw the actual candy bowl. They just look so professional, all dipped in white and rich milk chocolate, ready for spooky sprinkles. Trust me, you need these in your holiday arsenal!

Why This Halloween Chocolate Covered Pretzels Recipe Works So Well
When the holidays roll around, the last thing anyone needs is a complex recipe that requires hours of tending. That’s why these Halloween Chocolate Covered Pretzels are my go-to sanity saver. They deliver maximum festive impact with minimal effort. Honestly, you get the fun without the fuss!
- No oven required—just a microwave for melting chocolate.
- The two-step dipping process is surprisingly easy for beginners.
- They set up quickly, meaning less waiting around! See how we keep things fast with another genius homemade treat!
Quick Prep Time for Last-Minute Halloween Chocolate Covered Pretzels
You read that right—we’re looking at about 20 minutes total before these are cooling. This is clutch for any last-minute school needs or impromptu gatherings. Because this recipe focuses on dipping and sprinkling, it’s the fastest route to amazing Halloween Chocolate Covered Pretzels you can find. It’s pure magic!
Simple Dipping Technique for Perfect Coating
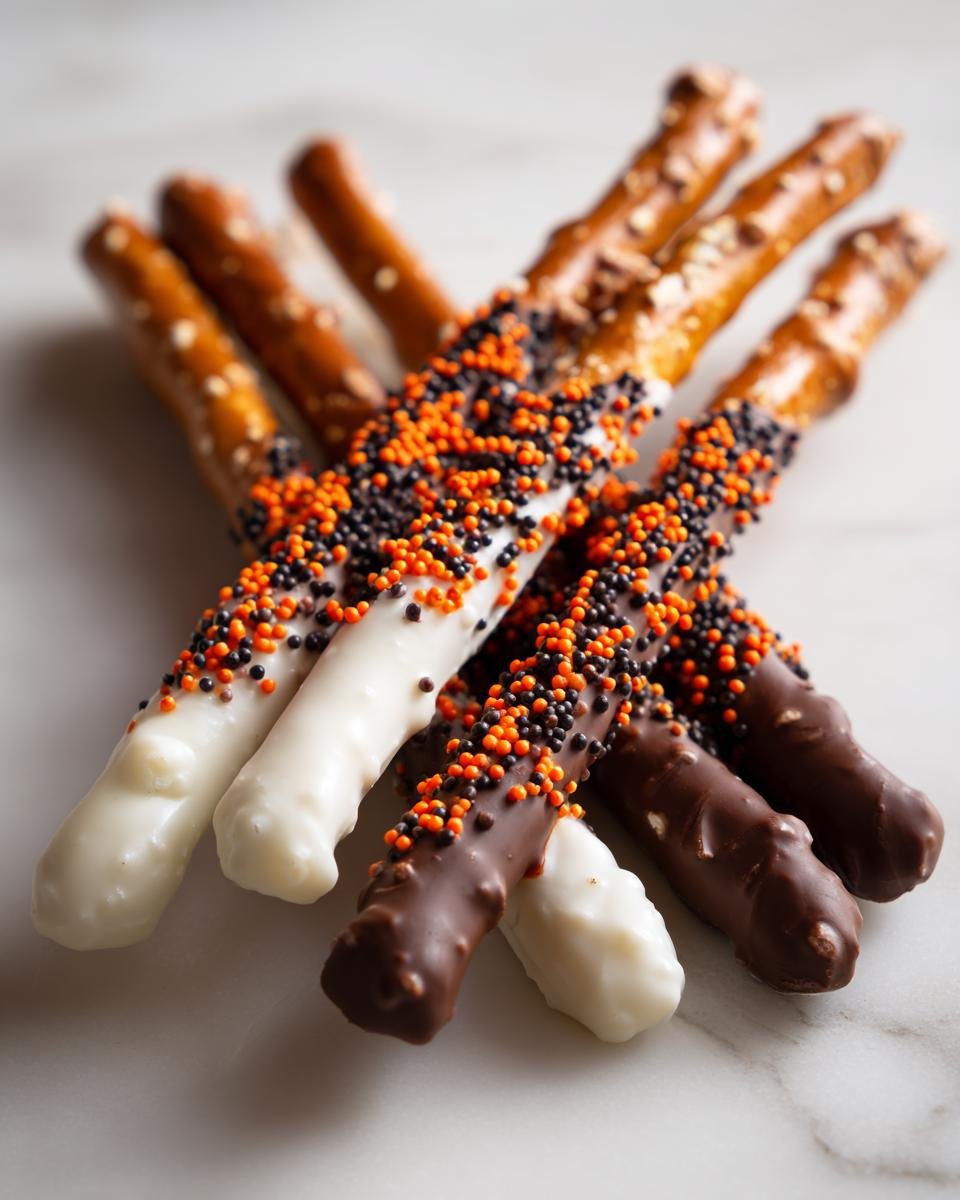
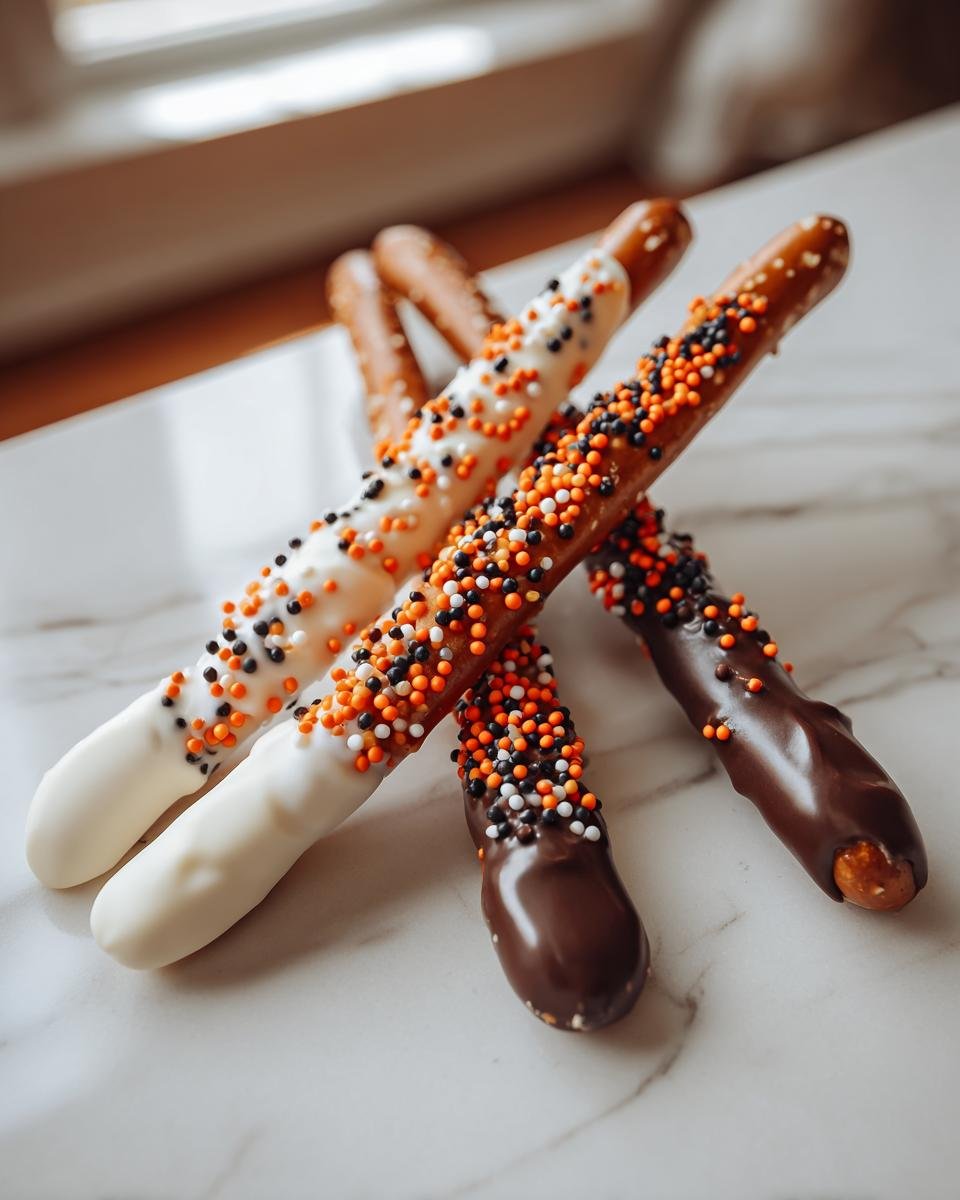
Don’t worry if you’ve never dipped anything before, because this method forces you to be successful. We use a clean two-tone look—one color, then the other. You just dip one half perfectly, decorate it, let it set slightly, and then move onto the second chocolate color. It sounds fancy, but it’s genuinely just dipping!
Essential Ingredients for Festive Halloween Chocolate Covered Pretzels
When we’re talking about making amazing Halloween Chocolate Covered Pretzels, the ingredients list is short, which is the best part! But those few things need to be exactly right, or your coating won’t set up perfectly. I always keep these items stocked up before October hits so I can jump into action fast.
You’ll need just three main things: the crunch, the coating, and the spooky flair. Stick to the amounts listed below, and you’ll have about twenty gorgeous treats ready to go!
Chocolate Wafers and Pretzel Rods
First up, ditch those standard chocolate chips! They have stabilizers that make them seize up when you try to melt them for dipping. You absolutely must use melting wafers, sometimes called candy melts. You’ll need a 12-ounce bag of white melting wafers and then 8 ounces of the milk chocolate kind. For the base, grab one big bag of sturdy pretzel rods—not the little twists, we want those long rods for dipping!
My secret here is letting the wafers sit on the counter for about 15 minutes before microwaving. Cold chocolate can shock and burn easier. We want smooth, gorgeous coats every time!
Decorations for Your Halloween Chocolate Covered Pretzels
This is where the fun starts! You need assorted Halloween sprinkles. I always look for mixes that have little ghosts, tiny pumpkin shapes, or just really great combinations of black, orange, and lime green in them. You want the visual punch! When you get your sprinkles ready for your Halloween Chocolate Covered Pretzels, put them in shallow bowls so you can roll or dip the chocolate right into them—it makes the process so much cleaner and faster!
Step-by-Step Instructions for Making Halloween Chocolate Covered Pretzels
Alright, let’s get down to business! Making these gorgeous Halloween Chocolate Covered Pretzels is really about timing and having a good spot ready to go. Since we aren’t baking, the prep area is the most important thing. I always grab my big baking sheet and make sure I have a fresh sheet of parchment paper ready to go. That paper is your best friend—it guarantees zero wrestling matches when you try to get the finished pretzels off later!
Once the sheet is lined, we start melting the white chocolate. Remember, those wafers melt best when you go easy on them. Pop them in the microwave in 30-second bursts, stirring between each one! If you get impatient, you’ll burn them, and nobody wants scorched candy flavor!
Preparing the Surface and Melting the First Chocolate Layer
First things first: Line that baking sheet with parchment paper. I stressed it before, but seriously, don’t skip this. You want those pretzel rods to lift off perfectly clean. Next, melt your white chocolate wafers following package directions, but remember my rule: short bursts in the microwave, stirring well after every 15 or 20 seconds. We’re aiming for silky smooth, not grainy or stiff. Keep that bowl of melted chocolate close to your sprinkles!
Dipping and Decorating the White Chocolate Half
Now for the fun! Take a pretzel rod and dip about half of it straight down into the warm white chocolate. Try to rotate it as you pull it out so you get an even, thick coating—no bald spots allowed! You need to work quickly here. The minute that white chocolate is coated, gently roll the wet part or hold it over the bowl and shower it with those amazing Halloween sprinkles. Get them on there before the chocolate starts to firm up. Then, lay that beauty down on the parchment paper to chill slightly.
Completing the Second Chocolate Layer and Setting
Once that first half is looking decent, it’s time for the milk chocolate! Melt the milk chocolate wafers the same way you did the white ones—slow and steady wins the race here. Now, take the pretzel and dip the *uncoated* half into the milk chocolate. Try to get a nice clean line where the white chocolate stops. Place it back on the parchment sheet. You can let these set up completely at room temperature if your kitchen isn’t too warm, but for guaranteed firmness, pop the whole sheet in the fridge for about 15 minutes. That quick chill sets the chocolate firmly so you can move them around without boo-boos! If you want to see another speedy holiday treat, check out how we handle quick holiday setting times in other recipes!
Expert Tips for Perfect Halloween Chocolate Covered Pretzels
Look, making Halloween Chocolate Covered Pretzels is easy, but making them look *amazing*? That takes a couple of tricks up my sleeve. You want those clean dips, not messy blobs where the colors run into each other. I’ve learned a few things over the years that stop rookie mistakes before they even start, especially when I’m managing two different colors of melted chocolate at once. These small adjustments make all the difference between a home-dipped look and a professional candy shop look!
Troubleshooting Thick Chocolate
The biggest heartbreak is when your chocolate—especially the white kind—starts getting thick and gloppy halfway through dipping. If that happens, don’t dump it out! Remember I mentioned microwaving in short bursts? If it’s really sluggish, you can add just a tiny bit of neutral oil, like canola, or even some vegetable shortening. I mean half a teaspoon, stir it in, and give it another 10 seconds in the microwave. It sounds scary to add fat to melting wafers, but it loosens them right up so you can get that perfect, thin sheet of chocolate around your pretzels. If you want to dive deeper into avoiding common baking disasters, check out this great piece on one mistake to avoid for homemade perfection!
Achieving Clean Separation Lines
This is the key aesthetic detail for our two-tone Halloween Chocolate Covered Pretzels. You want a sharp border between the white and the milk chocolate, right? The secret is what I call the “drip-and-tap.” When you pull the pretzel out of the second chocolate bath (the milk chocolate, in our case), hold it vertically over the bowl. Give the rod a gentle tap against the side of the bowl. Not a hard whack! Just a little tap. This quick vibration forces the excess chocolate to drip off cleanly, and the little bit left clinging to the edge will set into a nice, crisp division line when it cools down. It takes a little practice, but once you nail that tap, your pretzels will look showroom-ready!
Creative Variations for Your Halloween Chocolate Covered Pretzels
You know, once you master the basic dip, you start thinking, “How can I make these even more Halloween-y?” Because honestly, while sprinkles are fun, sometimes you need something that really pops! These Halloween Chocolate Covered Pretzels are such a great vehicle for creativity. You can totally switch up the colors and textures, and it still only takes 20 minutes. I love experimenting with different colors of melts, almost like making a tiny version of my favorite holiday bark!
Alternative Chocolate Choices for Halloween Chocolate Covered Pretzels
If you’re already using white and milk chocolate, the easiest switch-up is swapping the milk chocolate for dark! Dark chocolate gives such a sophisticated contrast to that sweet white layer, and it’s perfect if you’re making these for adult guests. But if you really want the vibrant colors of the season, look for orange or purple candy melting wafers—they are usually found right next to the white and dark ones!
Imagine dipping half your pretzel rods into brilliant orange, letting that set, and then dipping the other half in deep purple! That’s peak spooky aesthetic for your Halloween Chocolate Covered Pretzels. It requires zero baking, just a little pre-planning to grab those different colored packets.
Beyond Sprinkles: Other Toppings
Sprinkles are great, but sometimes you need more texture, right? If you have any leftover cookies—like Oreos or even vanilla wafers—crush them up finely. After you dip the first side in chocolate, roll that wet section in the crushed cookies immediately. It gives the pretzel a fantastic gritty texture that feels really autumnal.
And don’t forget about drizzling! Once the white and milk layers have set completely, I like to melt a tiny bit more of the *opposite* color and drizzle it diagonally across the surface. For example, melt a little white chocolate and drizzle thin lines over the milk chocolate sections. It looks professional! If you love that drizzle technique on other treats, you should check out the instructions for chocolate peppermint bark—it uses the exact same principle for layering flavors.
Storing Your Homemade Halloween Chocolate Covered Pretzels
Okay, so you’ve made your gorgeous, festive Halloween Chocolate Covered Pretzels, and now they are just sitting there looking too perfect to eat, right? Don’t let them linger on the counter hoping they last forever! These need proper storage, especially since they are covered in chocolate and we want those beautiful swirls to stay looking sharp.
The absolute rule here, and listen closely because this prevents disaster, is to use an airtight container. I can’t stress this enough! If you just leave them on a plate uncovered, two bad things happen. First, if your kitchen is humid at all—and October can be tricky—the chocolate might start getting that hazy, whitish look called ‘sugar bloom.’ That happens when moisture hits the surface. Second, open containers absorb smells, and nobody wants their spooky pretzel tasting like last night’s garlic bread!
So, once those pretzels are completely firm—and I mean *rock solid*—gently nestle them into a good, sturdy container. If you have parchment paper scraps left over, lay a sheet at the bottom of the container before adding your first layer of Halloween Chocolate Covered Pretzels. This prevents any sticking while they sit, keeping them perfect for parties all week long. They generally stay fantastic for about five to seven days stored this way.
Serving Suggestions for Halloween Chocolate Covered Pretzels
Once you’ve got these chocolate-dipped beauties ready, the final step is making sure they put on a great show! These aren’t just snacks; they are little edible decorations themselves. I think the presentation is half the fun when it comes to holiday treats. You can set these out for just about any gathering, but they really shine at a spooky open house or as a fun, easy addition to a kid’s party spread.
For maximum visual impact, think about height and theme. Instead of just laying them flat on a platter, try standing them up! You can use short drinking glasses or even mason jars filled with a handful of dry beans or sugar—anything to keep the rods upright and visible. It makes people notice them right away!
Since these are so quick and easy, they pair perfectly with something that takes longer, like a big batch of chili or a huge pot of slow-cooked pulled pork. When you have something hearty simmering, the sweet crunch is the perfect counterpoint. If you’re heading to a potluck where you know the food is heavy, these are fantastic palette cleansers. Speaking of party planning, if you need some killer savory ideas to round out your spread, you absolutely have to check out my guide to the ultimate party dip lineup—it’s always an absolute smash hit!
For themed drinks, nothing beats a simple spiderweb design on a glass of deep purple grape juice or sparkling cider. The dark liquid makes those white and orange sprinkles on the pretzels really pop. Honestly, the only thing better than eating these is watching someone take that first huge, satisfying crunch!
Frequently Asked Questions About Halloween Chocolate Covered Pretzels
I always seem to get the same questions when I bring these pretzel rods to gatherings, so I figured I’d put the answers right here! Whether you’re making a giant batch or just testing the recipe out for the first time, these little tweaks usually solve the biggest worries people have when dipping chocolate.
Can I make Halloween Chocolate Covered Pretzels ahead of time?
Oh, absolutely! That is one of the best parts about these Halloween Chocolate Covered Pretzels—they are perfect for making days in advance. Since there is no fresh fruit or dairy involved, they keep really well. Just make sure you follow the storage rules: airtight container, room temperature, and avoid humidity. If you do that, they’ll be just as crunchy and festive a full week later!
What is the best way to keep the chocolate from streaking?
Streaking, or what some people call ‘bloom,’ is super annoying because it ruins that beautiful, crisp look you worked so hard to achieve. This usually happens because of temperature shock! Don’t try to rush setting them by throwing them into a freezing-cold freezer. Pulling them straight from a warm kitchen into an ultra-cold freezer causes condensation, which makes the chocolate streak or look dull later on. Let them set on the counter first, or if you are short on time, use the fridge for just 15 minutes, like I suggested, where it’s cool but not shocking!
Can I use regular chocolate chips instead of melting wafers for this Halloween Chocolate Covered Pretzels recipe?
I know it seems like you should be able to swap them out, but please don’t if you can help it! Regular chocolate chips have stabilizers in them that help them keep their shape when baked into cookies. When we try to melt them just for dipping, those stabilizers make the chocolate seize up, get thick, and often turn grainy before you can even finish coating half your batch of Halloween Chocolate Covered Pretzels. Melting wafers are specifically cut to be smooth and fluid when melted, which is exactly what we need for that thin, perfect coating!
Nutritional Estimate for These Treats
Now, I know when we’re making fun, festive treats for parties, nutrition isn’t exactly at the top of the priority list, but I always try to give you guys a rough idea of what you’re dealing with! Remember, everyone’s batch will vary a tiny bit depending on how thick you dip or how many sprinkles you pile on. This estimate is based on the recipe using pretzel rods and coated with both white and milk chocolate halves.
These values are just a good ballpark figure based on standard component tracking. Think of this as helpful guidance rather than a strict diet requirement for your party snacks—seriously, enjoy them!
- Serving Size: 1 pretzel
- Calories: Around 150 (That’s less than I thought for two layers of chocolate!)
- Sugar: Roughly 12g
- Fat: About 9g
- Sodium: 180mg (Mostly from the pretzel itself, you know!)
We’ve got some saturated fat in there from the premium melting wafers—that’s where the flavor comes from, after all. The good news is that these are quick little bites, so they are easy to fit into an evening of snacking. Just enjoy them responsibly, and save the tracking for your everyday meals!
Print
Halloween Chocolate Covered Pretzels
- Total Time: 20 min
- Yield: About 20 pretzels 1x
- Diet: Vegetarian
Description
Simple recipe for making chocolate-covered pretzels decorated for Halloween.
Ingredients
- 1 bag pretzel rods
- 12 ounces white chocolate melting wafers
- 8 ounces milk chocolate melting wafers
- Assorted Halloween sprinkles
Instructions
- Line a baking sheet with parchment paper.
- Melt the white chocolate wafers according to package directions.
- Dip each pretzel rod halfway into the melted white chocolate, rotating to coat evenly.
- Immediately sprinkle the wet chocolate with Halloween sprinkles.
- Place the coated pretzels on the prepared baking sheet.
- Melt the milk chocolate wafers according to package directions.
- Dip the remaining uncoated half of each pretzel into the melted milk chocolate.
- Place the pretzels back on the parchment paper.
- Allow the chocolate to set completely at room temperature or refrigerate for 15 minutes until firm.
Notes
- You can use dark chocolate instead of milk chocolate for a different flavor.
- If the chocolate thickens while working, microwave it in short bursts to re-melt.
- Store finished pretzels in an airtight container.
- Prep Time: 20 min
- Cook Time: 0 min
- Category: Dessert
- Method: Dipping
- Cuisine: American
Nutrition
- Serving Size: 1 pretzel
- Calories: 150
- Sugar: 12g
- Sodium: 180mg
- Fat: 9g
- Saturated Fat: 5g
- Unsaturated Fat: 4g
- Trans Fat: 0g
- Carbohydrates: 16g
- Fiber: 0g
- Protein: 2g
- Cholesterol: 10mg
Keywords: Halloween, chocolate covered pretzels, pretzel rods, easy candy, holiday treat