Oh, Easter! It just fills my heart with such a happy, buzzy feeling, doesn’t it? All the pastel colors, the sweet smell of spring in the air, and of course, the hunt for those brightly colored eggs! This year, I’m beyond excited to share my absolute favorite, the Irresistible Easter Egg Oreo Cookie Balls Recipe To Try. Seriously, these little guys are a dream! They’re no-bake, totally kid-friendly (and adult-friendly, let’s be honest!), and they just scream ‘festive’! It reminds me of baking with my little ones, turning the kitchen into a rainbow explosion, and seeing their faces light up. This recipe is all about capturing that pure, simple Easter joy in every single bite.

Why You’ll Love This Irresistible Easter Egg Oreo Cookie Balls Recipe
Seriously, if you’re looking for a fun, festive, and ridiculously easy treat for Easter, you’ve come to the right place! These little delights are my absolute go-to because they are just packed with goodness. You’ll want to whip these up time and time again.
- So Easy to Whip Up: Honestly, the hardest part is waiting for the cream cheese to soften! It’s a no-bake wonder that even the busiest bees can manage.
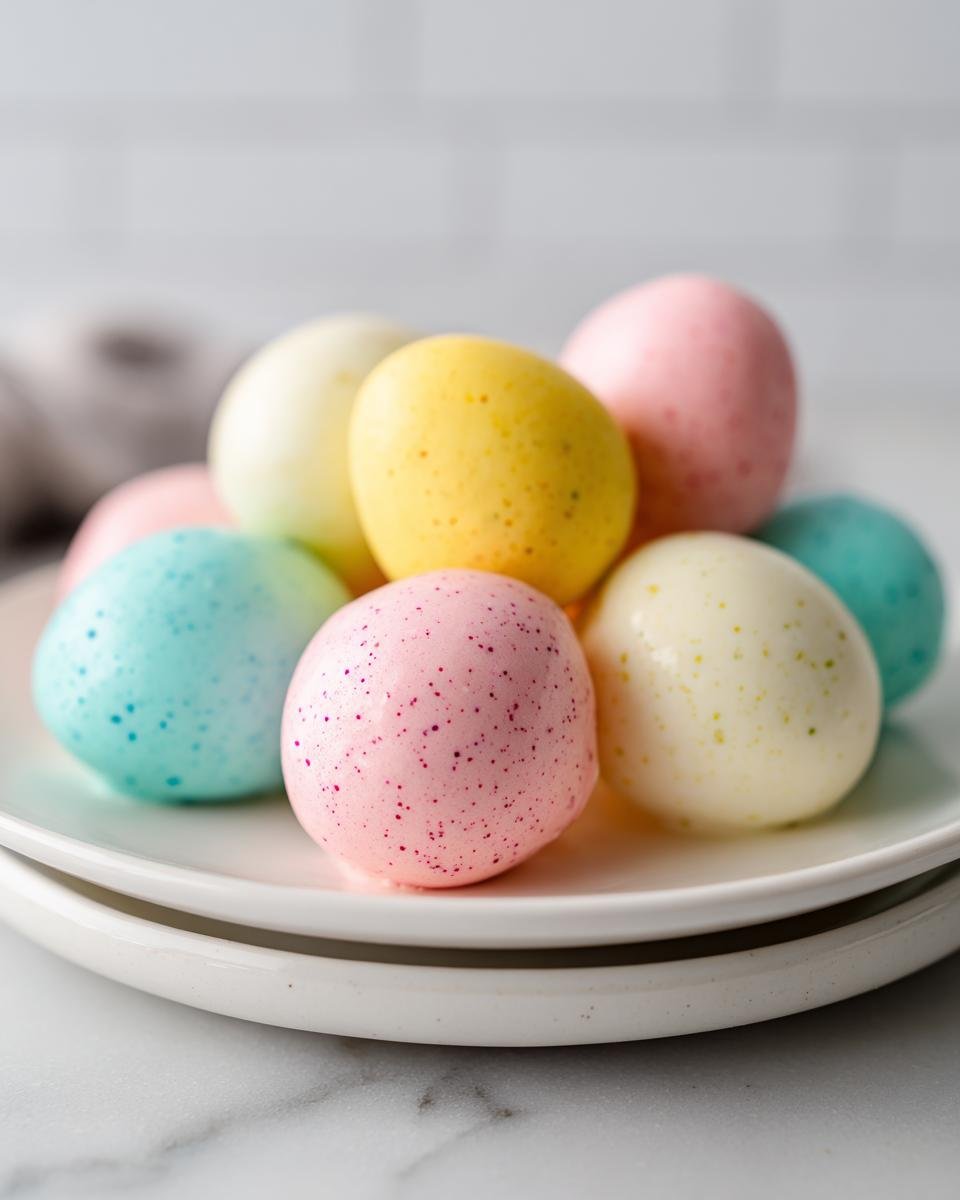
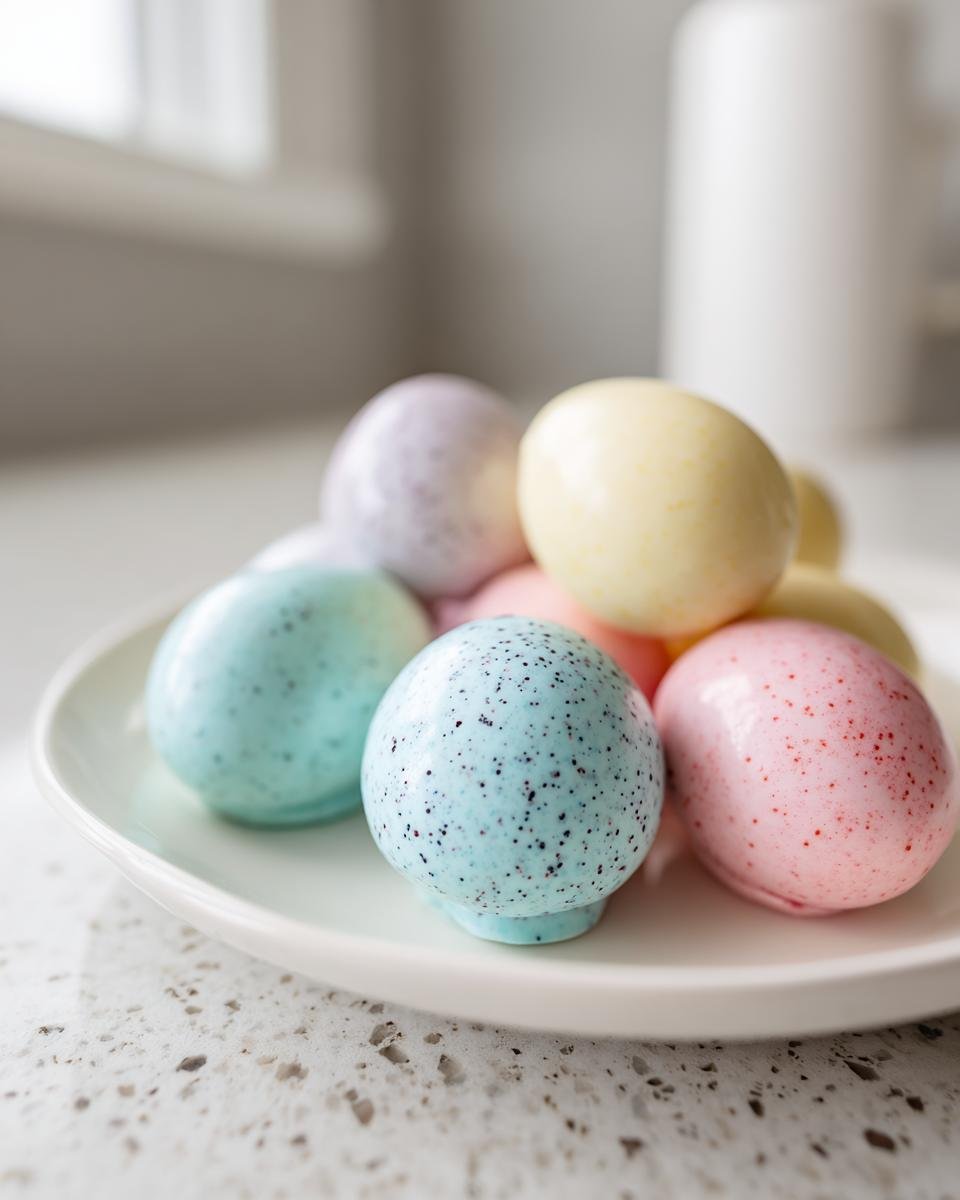
- Picture-Perfect Pastel Pretty: Who doesn’t love a bit of color? These egg shapes in their dreamy pastel coatings are just begging to be part of your Easter spread. They look so professional, too!
- That Dreamy Oreo & Cream Cheese Magic: If you’re an Oreo fan, you’re going to be obsessed. It’s that perfect, rich, crumbly base you know and love, all wrapped up in sweet chocolate.
- No Oven Needed, Yay! This is a huge win, especially when the oven is already working overtime with Easter dinner plans. These are a cool, no-fuss treat.
- Endless Color Possibilities: Want a specific shade of robin’s egg blue or a soft daffodil yellow? Just play with a few drops of food coloring! You can match any Easter theme.
- Kid-Friendly Fun: Get the little ones involved! Rolling the dough into eggs and dipping them in chocolate is a blast and makes for some seriously fun kitchen memories.
Gather Your Ingredients for Irresistible Easter Egg Oreo Cookie Balls
Alright, let’s get down to business and gather everything we need for these adorable little egg-shaped wonders! Having all your bits and bobs ready makes the whole process so much smoother, trust me. Dig into your pantry and fridge, and let’s round up these goodies.
You’re going to need about 24 classic Oreo cookies – make sure they’re the standard ones, not the double-stuffed if you can help it, for the best texture. Then, grab one whole package, that’s 8 ounces, of cream cheese. It *really* needs to be softened, so pull that out of the fridge maybe an hour before you plan to start mixing. For the dreamy coating, we’ll need about 1 cup of white chocolate chips, and just a tiny bit of shortening (about 1 tablespoon) to make it all melt down super smooth and shiny. Oh, and the fun part – a little collection of food coloring bottles in all your favorite Easter pastels: green, purple, pink, yellow, orange, blue… whatever makes you happy!
Essential Equipment for Your Easter Cookie Balls
Okay, so you’ve got your ingredients, but what do you actually need to *make* these magic little Easter treats? Don’t worry, it’s not rocket science, just a few trusty kitchen helpers!
You’ll definitely want a food processor for those Oreos, or a sturdy zip-top bag and a rolling pin if you’re feeling robust! A couple of mixing bowls are a must – one for the Oreo mixture, and then a few small ones for your colorful chocolate dips. A spatula, preferably a silicone one, is perfect for scraping bowls clean and mixing that cream cheese in. And for shaping? Just your clean hands! Oh, and a baking sheet lined with some parchment paper. That’s it! Easy peasy.
Step-by-Step Guide to Making Irresistible Easter Egg Oreo Cookie Balls
Alright, ready to get hands-on and make these adorable little Easter gems? It’s honestly so much fun, and watching them come to life is half the joy! Grab your apron, put on some happy music, and let’s dive in! These steps will help you create a treat almost as tasty as these Oreo cheesecake delights.
Preparing the Oreo Base
First things first, we need to turn those Oreos into fine, sandy crumbs. You can pop them into a food processor until they’re super fine, or if you don’t have one, just put them in a sturdy zip-top bag, seal it up tight, and give them a good whack with a rolling pin until you get that perfect dust. Once your crumbs are ready, dump them into a mixing bowl. Now, add that softened cream cheese – remember, it needs to be soft so it blends like a dream! Mix it all up really well with a spatula or even your hands until you’ve got a nice, uniform dough. It should be firm enough to hold its shape, but not dry or crumbly, kind of like the base for this amazing icebox cake.
Shaping the Easter Eggs
This is where the magic starts to look like Easter! Grab about a tablespoon of your Oreo-cream cheese mixture at a time. Roll it between your palms to form little egg shapes. Try to make them roughly the same size so they’re all ready for dipping at the same time. Don’t stress if they aren’t perfectly smooth; a little rustic charm is totally fine! Just gently form them into that classic egg shape. Lay them out on your parchment-lined baking sheet as you go, giving them a little space.
Crafting the Colorful Chocolate Coating
Now for the colorful fun! In a microwave-safe bowl, combine your white chocolate chips and that tablespoon of shortening. Pop it in the microwave for 30-second intervals, stirring really well in between each blast. Like making my Easter chocolate bark, keep going until it’s all melted and smooth as silk. It shouldn’t be lumpy *at all*. Once it’s perfectly melted, divide this white chocolaty goodness into a few smaller bowls. This is where you get to play artist! Add just a few drops of your food coloring to each bowl – a little goes a long way – and stir until you’ve got those beautiful pastel shades you’re after. Think soft blues, dreamy pinks, cheerful yellows!
Dipping and Decorating Your Cookie Balls
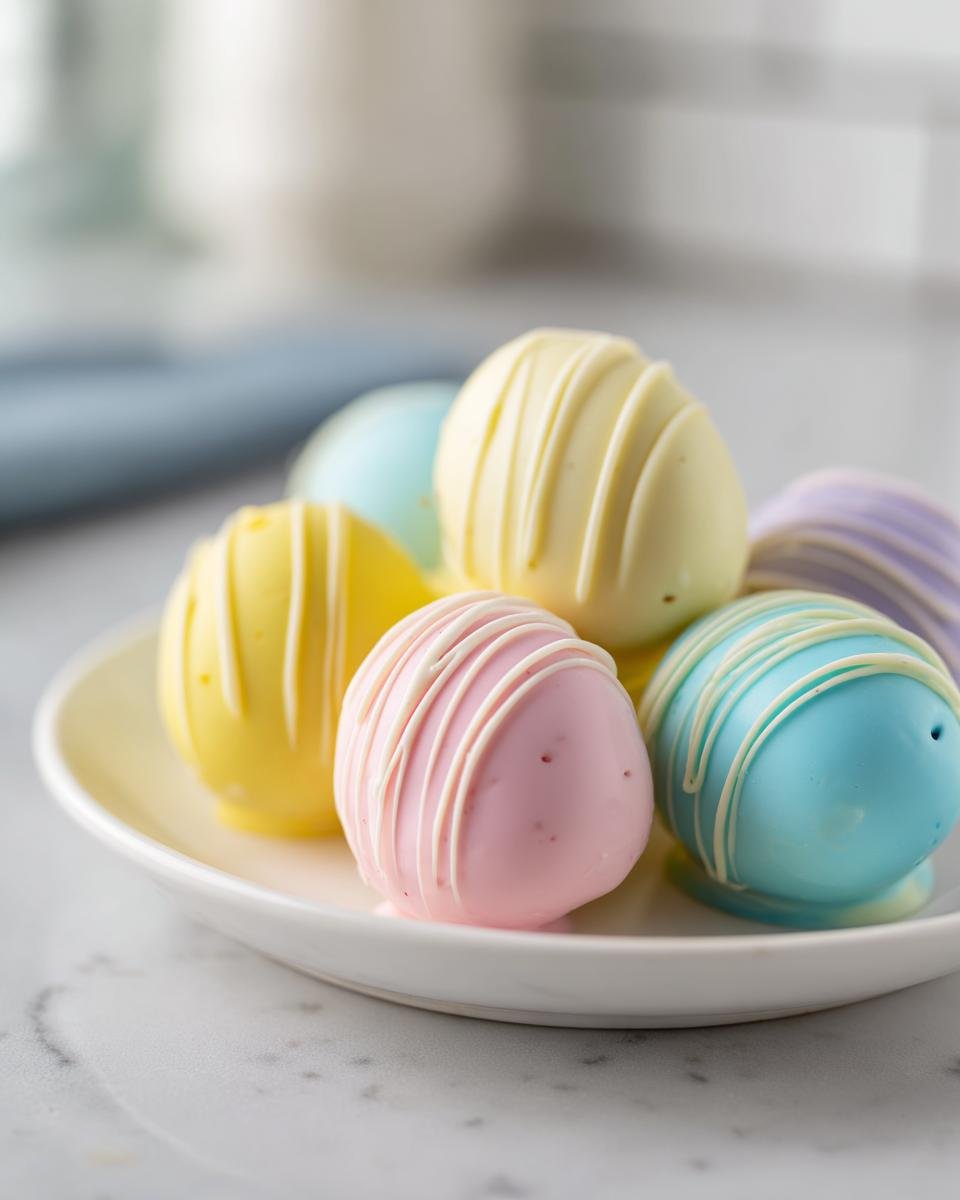
Time to dress up our little eggs! Take one egg-shaped cookie ball at a time and dip it into one of your colorful chocolate bowls. Use a fork or a toothpick to help coat it completely, letting any excess chocolate drip back into the bowl. Gently place the coated egg back onto your parchment-lined baking sheet. If you’re feeling fancy, now’s the perfect time to sprinkle on some Easter-themed sprinkles before the chocolate hardens. You can find some super cute ones out there!
Setting and Serving Your Irresistible Easter Egg Oreo Cookie Balls
And there you have it! Your beautiful, colorful Easter Egg Oreo Cookie Balls are almost ready. Just let them sit at room temperature for a little while until the chocolate coating is completely set and firm. You can pop them in the fridge for about 10-15 minutes if you’re in a hurry, but I usually just let mine set up on the counter. Arrange them on a pretty platter, and get ready for all the ‘oohs’ and ‘aahs’!
Tips for Perfect Easter Egg Oreo Cookie Balls
You know, even with the simplest recipes, a few little tricks can make all the difference between good and absolutely GORGEOUS! These Easter Egg Oreo Cookie Balls are already a breeze, but a couple of my go-to tips will ensure they turn out perfectly every single time. Trust me, these little nuggets of wisdom are just as important as the ingredients themselves!
- Cream Cheese Consistency is Key: Seriously, make sure that cream cheese is *really* softened. If it’s too cold, your cookie balls will be lumpy and hard to roll. If it’s too warm or melted, they’ll be too sticky. Aim for that perfect, pliable stage where it’s squishy but not gooey.
- Chill If Things Get Sticky: Sometimes, especially in a warm kitchen, the Oreo mixture can get a little soft and sticky when you’re trying to roll it. If that happens, just pop the whole bowl in the fridge for about 10-15 minutes. It makes rolling so much easier and cleaner!
- Don’t Over-Drip the Chocolate: When you’re dipping your cookie balls, give them a gentle shake to let the excess chocolate drip off. If you leave too much, you can end up with a heavy chocolate base that makes them wobble or crack. A clean, smooth coating is the goal!
- The “Drizzle” Finish: If you have any plain white chocolate or leftover colored chocolate, you can pop it into a piping bag with a tiny tip (or even a zip-top bag with a corner snipped off) and drizzle it over the set cookie balls for an extra fancy touch. It looks so professional!
Ingredient Notes and Substitutions
Just a few notes on some of the ingredients to make sure your cookie balls are absolutely perfect! For the Oreos, classic ones work best for that signature flavor and texture. If you can’t find those, any dark chocolate sandwich cookie will do in a pinch, but they might change the taste just a smidge! The cream cheese really should be full-fat and softened – trust me on this one; it makes all the difference for a smooth, rollable dough. And for the chocolatey coating, while white chocolate chips are my go-to for getting those vibrant colors, you could totally use melting wafers or even candy melts if you prefer. They often set up a little faster!
Frequently Asked Questions About Easter Egg Oreo Cookie Balls
Got questions about these delightful little Easter treats? I’ve got answers! Making these is pretty foolproof, but a little insight can always help, right?
Can I make these Easter Egg Oreo Cookie Balls ahead of time?
Oh, absolutely! These are perfect for making ahead. I actually find they taste even better after they’ve had a day to let those flavors meld together. Just make sure they’re stored properly in an airtight container in the fridge, and they’ll be good to go for several days. Perfect for getting a head start on your Easter baking!
How should I store leftovers?
Leftovers? What leftovers? Just kidding! If, by some miracle, you have any of these Irresistible Easter Egg Oreo Cookie Balls left, store them in an airtight container. They’ll keep beautifully in the refrigerator for about a week. They do tend to get a little bit firmer when chilled, so if you want to serve them at room temperature, just let them sit out for about 15-20 minutes before digging in.
Can I use different kinds of Oreos?
You can totally get creative with the Oreos! While classic Oreos are my number one pick because they give you that perfect neutral base and great texture, feel free to experiment. Golden Oreos would give you a lighter color and a vanilla-y twist, or maybe even some mint Oreos for a fun surprise flavor! Just remember that some flavored Oreos might change the final color of your cookie balls if the filling isn’t white.
How do I get the chocolate to coat smoothly?
The trick to a super smooth chocolate coating is twofold: first, make sure you’re melting your white chocolate chips with that little bit of shortening. The shortening helps it become more fluid and less likely to seize up. Second, be patient! Melt it in short bursts in the microwave, stirring thoroughly each time. If it looks a tiny bit clumpy, keep stirring gently; sometimes it just needs a little coaxing. And if it seems too thick, you can add just a *tiny* bit more shortening, no more than half a teaspoon at a time.
Nutritional Information
Just a little heads-up, the nutritional info for these Irresistible Easter Egg Oreo Cookie Balls is estimated per cookie ball, and it can totally change depending on the exact brands you use and how big you roll your little eggs! But roughly, you’re looking at about 150 calories, 9 grams of fat (with about 5 grams of that being saturated), 17 grams of carbs, and 2 grams of protein per tasty bite.
Print
Irresistible Easter Egg Oreo Cookie Balls
- Total Time: 30 min
- Yield: 24 cookie balls 1x
- Diet: Vegetarian
Description
A simple recipe for festive Easter-themed Oreo cookie balls.
Ingredients
- 24 Oreo cookies
- 1 package (8 ounces) cream cheese, softened
- 1 cup white chocolate chips
- 1 tablespoon shortening
- Green food coloring
- Purple food coloring
- Pink food coloring
- Yellow food coloring
- Orange food coloring
- Blue food coloring
Instructions
- Crush Oreo cookies into fine crumbs.
- In a bowl, mix Oreo crumbs and softened cream cheese until well combined.
- Roll the mixture into egg shapes.
- Melt white chocolate chips with shortening in a microwave-safe bowl in 30-second intervals, stirring until smooth.
- Divide the melted white chocolate into small bowls. Add a few drops of food coloring to each bowl to create different pastel colors.
- Dip the egg shapes into the colored white chocolate, ensuring they are fully coated.
- Place the coated cookie balls on a baking sheet lined with parchment paper.
- Allow the chocolate to set completely before serving.
Notes
- You can use other candy melts for coating if preferred.
- Decorate with sprinkles before the chocolate sets for added flair.
- Prep Time: 30 min
- Cook Time: 0 min
- Category: Dessert
- Method: No-Bake
- Cuisine: American
Nutrition
- Serving Size: 1 cookie ball
- Calories: 150
- Sugar: 15g
- Sodium: 50mg
- Fat: 9g
- Saturated Fat: 5g
- Unsaturated Fat: 4g
- Trans Fat: 0g
- Carbohydrates: 17g
- Fiber: 1g
- Protein: 2g
- Cholesterol: 10mg
Keywords: Easter, Oreo, cookie balls, no-bake, dessert, chocolate, cream cheese, festive, egg shape