
Oh, hello there, fellow dessert lover! Have you ever seen a dish that just screams “party in a pan”? Well, let me introduce you to my absolute favorite showstopper: Mosaic Gelatin with Rompope. This isn’t just any gelatin; it’s a vibrant, colorful masterpiece with a secret creamy base that will knock your socks off! Imagine bright, jewel-toned gelatin cubes suspended in a rich, dreamy rompope (that’s Mexican eggnog, by the way!) infused gelatin. It’s pure magic.
I’ve been making various kinds of mosaic gelatins for years, perfecting the jiggly, creamy balance. But when I discovered the addition of rompope? Game changer! It takes this already fun dessert to a whole new level of deliciousness. It’s the kind of dessert that gets gasps and “oohs” and “aahs” when you bring it out. Trust me, once you try this recipe, it’ll become a staple for all your festive gatherings. It’s truly a celebration in every single bite!

Why You’ll Love This Mosaic Gelatin with Rompope
Okay, so why should *you* make this Mosaic Gelatin with Rompope? Let me count the ways! First off, it’s just so darn easy to put together. Seriously, don’t let the fancy look fool you; it’s mostly chill time. But the payoff? Oh my goodness, the payoff is huge!
- It’s a total showstopper!
- The flavors are out of this world, a creamy dream.
- It’s surprisingly simple to make, even for beginners.
- You’ll feel like a kitchen wizard when you present it!
It’s truly a joy to create, and even more joyful to share!
The Allure of Mosaic Gelatin with Rompope
There’s just something about those vibrant, jewel-like cubes peeking out from the creamy, golden rompope base. It’s a feast for the eyes before it even hits your taste buds! And then, boom – the delightful jiggle, the burst of fruit, followed by that rich, sweet, slightly boozy (but not too much!) creaminess. It’s a texture and flavor party in every single bite that just works so perfectly together.
Essential Ingredients for Mosaic Gelatin with Rompope
Alright, let’s talk ingredients! For this Mosaic Gelatin with Rompope, we’re keeping it pretty straightforward, but each component plays a super important role in getting that perfect texture and flavor. You’ll want to have everything measured out and ready to go before you start, trust me, it makes the whole process so much smoother!
- 1 (7 gram) package unflavored gelatin (for the colored cubes)
- 1/2 cup cold water (for the first unflavored gelatin)
- 1 1/2 cups hot water (for dissolving flavored gelatins)
- 1 (3 ounce) package lime flavored gelatin
- 1 (3 ounce) package cherry flavored gelatin
- 1 (3 ounce) package orange flavored gelatin
- 1 (3 ounce) package grape flavored gelatin
- 2 (7 gram) packages unflavored gelatin (for the rompope base)
- 1 (12 fluid ounce) can evaporated milk
- 1 (14 ounce) can sweetened condensed milk
- 1 cup rompope (Mexican eggnog)
- 1 teaspoon vanilla extract
And don’t forget a little bit of cooking spray or oil to lightly grease your baking dish. It’s a small step, but it makes a huge difference when it comes to getting those beautiful squares out!
Detailed Ingredient Notes for Mosaic Gelatin with Rompope
The unflavored gelatin is our magic binder here, making everything set up beautifully. For the rompope, you can usually find it in the international aisle of larger grocery stores, or at a Mexican market – it’s what gives our creamy base that unique, cozy flavor. Don’t skimp on the quality of your flavored gelatins either; they’re the stars of our colorful mosaic! As for the milks, evaporated and sweetened condensed give us that rich, creamy texture without making it too heavy. It’s all about balance!
Step-by-Step Guide: Making Mosaic Gelatin with Rompope
Alright, let’s get into the fun part: actually making this gorgeous Mosaic Gelatin with Rompope! It might look a little intricate, but I promise, if you follow these steps, you’ll have a stunning dessert that everyone will rave about. Just take your time, and remember, a little patience goes a long way when you’re working with gelatin!
First things first, grab that 9×13 inch baking dish and give it a super light grease. I mean just a tiny bit of cooking spray, rubbed around with a paper towel. This little trick is going to save you so much heartache when it’s time to unmold or cut your beautiful creation. Trust me on this one!
Then, in a medium bowl, sprinkle one of those 7-gram packages of unflavored gelatin over 1/2 cup of cold water. Don’t stir it yet! Just let it sit there for about 5 minutes. This is called “blooming” the gelatin, and it’s super important for making sure it dissolves smoothly. Once it looks kind of lumpy and thick, you’re good to go.
Now, pour 1 1/2 cups of hot water over that bloomed gelatin and stir, stir, stir until it’s completely dissolved. You want it totally clear, no granules left. This is our base for all those pretty colored layers!
Next, divide this dissolved gelatin mixture evenly among four separate bowls. Now for the color! In each bowl, you’ll dissolve one package of your flavored gelatin – lime, cherry, orange, and grape. Stir each one until it’s fully, completely dissolved. You want vibrant, clear colors. Then, carefully pour each colored gelatin mixture into separate shallow dishes or small baking pans. Think pie plates or even shallow Tupperware. You want a relatively thin layer so it sets faster and is easy to cut. Pop those into the fridge for at least 4 hours, or until they’re super firm. You can even do this part the day before if you want to break up the work!
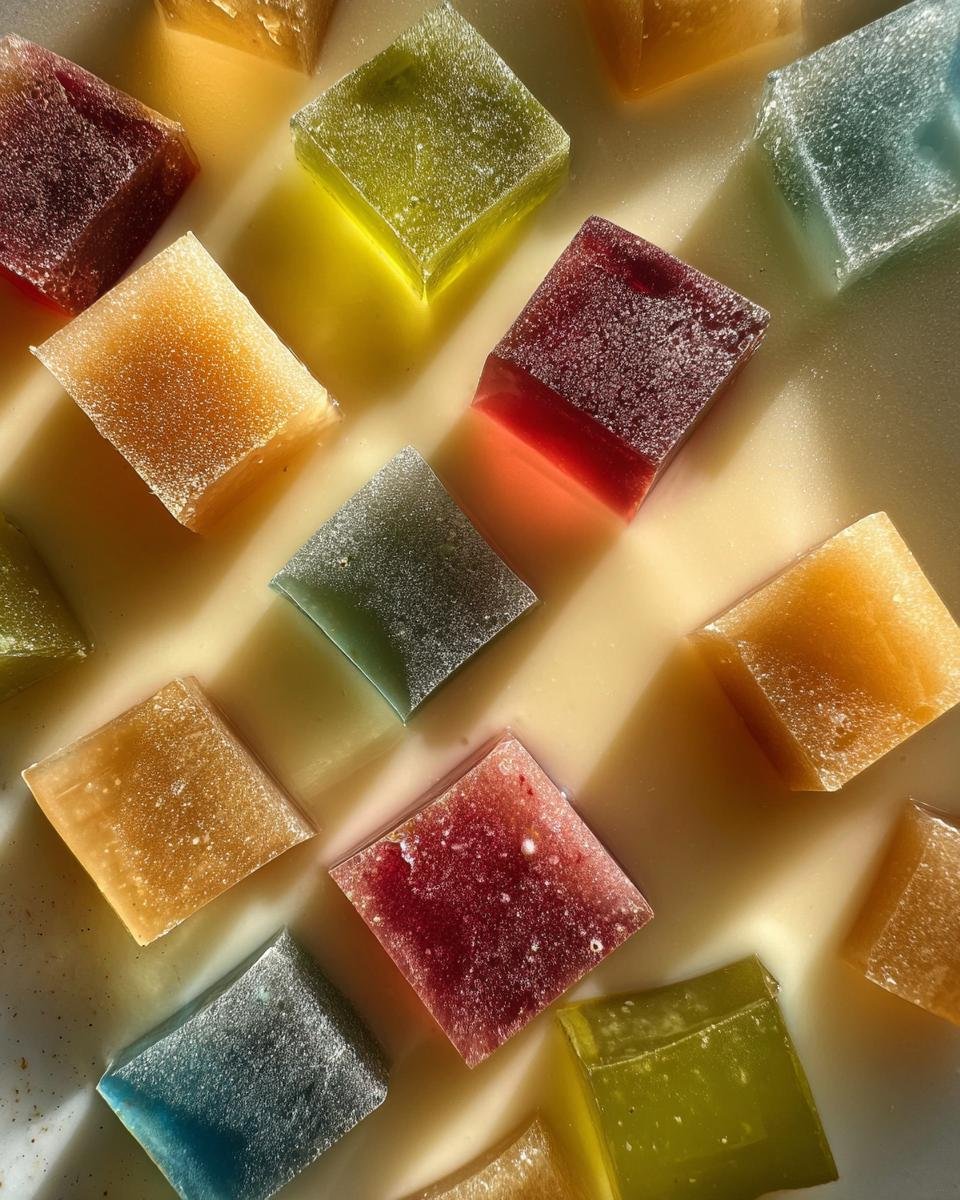
Once those colored gelatins are firm, it’s time for some cube action! Cut each one into about 1/2-inch cubes. You don’t need to be super precise, but try to make them roughly the same size. Gently mix all the different colored cubes together in a bowl, and then arrange them evenly in your prepared 9×13 inch baking dish. Try to spread them out so you get a nice mix of colors everywhere. It’s like building a little edible puzzle!
Okay, now for the creamy rompope base! In a small saucepan, sprinkle the remaining two 7-gram packages of unflavored gelatin over 1/2 cup of cold water. Again, let it sit and bloom for 5 minutes. Then, heat this mixture over low heat, stirring constantly, until the gelatin is completely dissolved. Seriously, keep stirring and don’t let it boil! If it boils, it can mess with the gelatin’s setting power. Once it’s clear, take it off the heat and let it cool down a bit. You don’t want it hot when it meets the milk mixture, or things could curdle. Just a few minutes of cooling is usually enough.
While that’s cooling, grab a large bowl and whisk together your evaporated milk, sweetened condensed milk, rompope, and vanilla extract. Whisk it really well until it’s all smoothly combined. Now, this is important: slowly, slowly pour that slightly cooled dissolved gelatin mixture into your milk mixture while whisking constantly. This slow stream and constant whisking help ensure it combines perfectly with no lumps or curdling. You want it smooth and uniform.
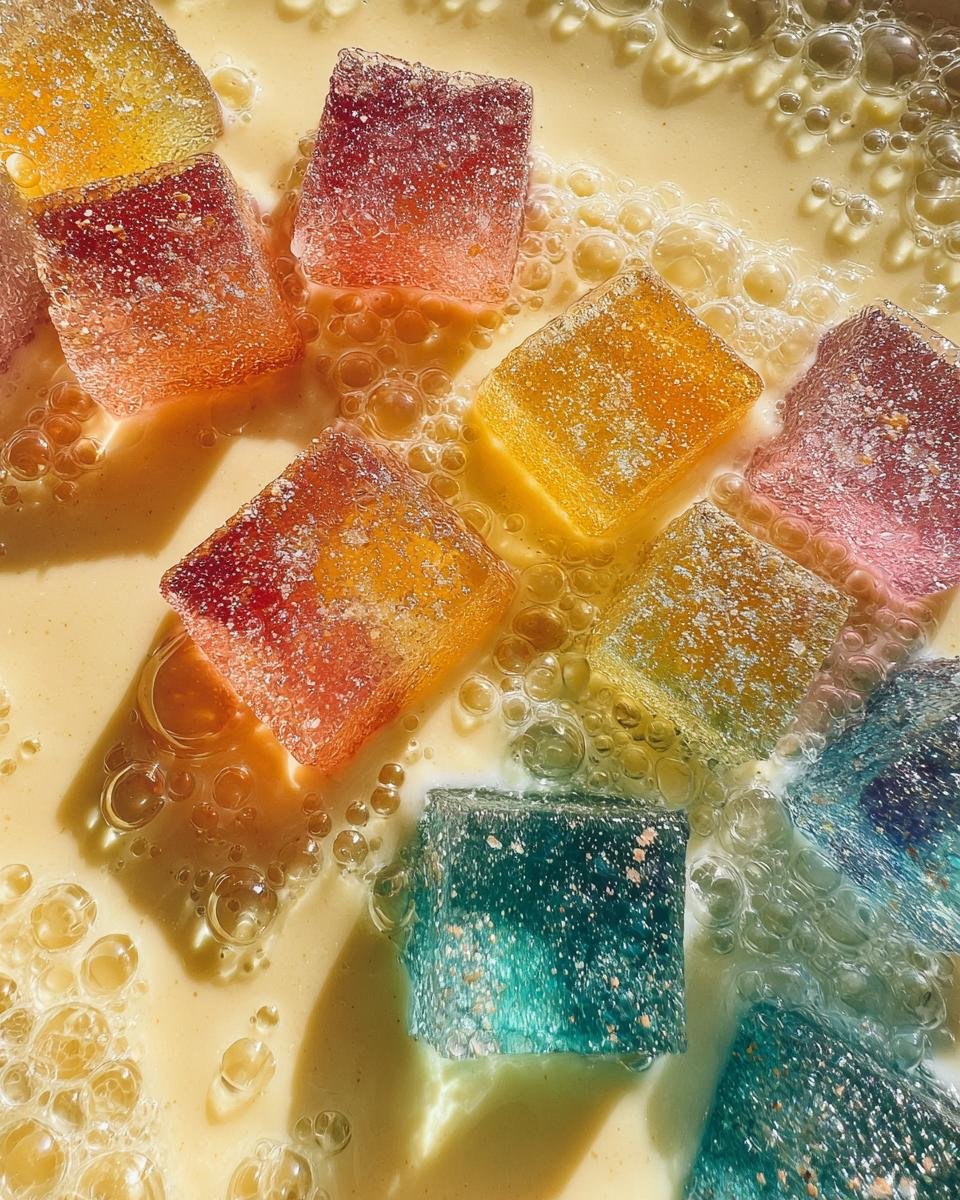
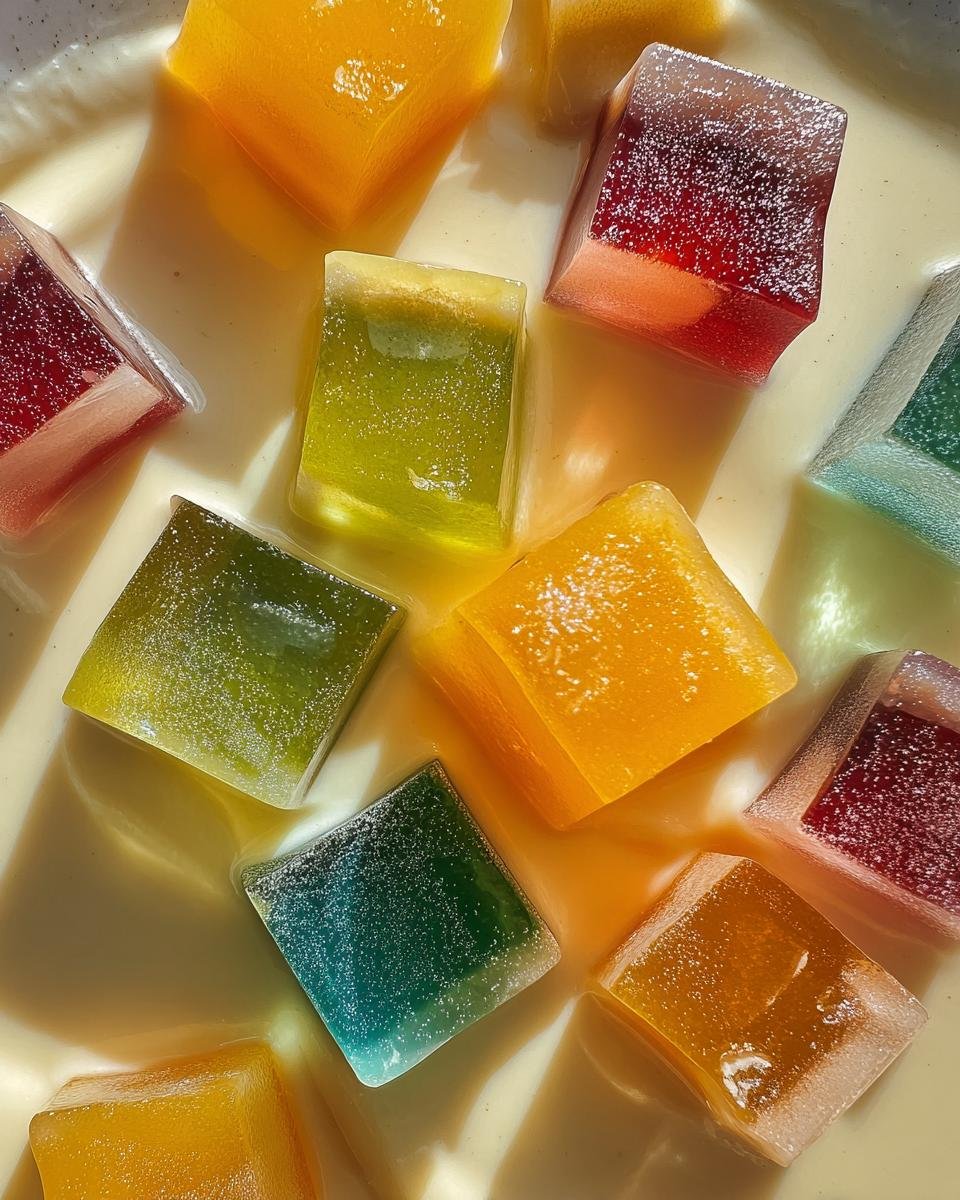
Finally, the grand assembly! Carefully pour that creamy rompope mixture over your beautiful colored gelatin cubes in the baking dish. Make sure it covers all the cubes and they’re suspended nicely throughout. You might need to gently nudge some cubes around with a spoon to get them evenly distributed. Then, back into the fridge it goes! This time, it needs at least 6 hours, or even better, overnight, to get completely set. You want it nice and firm before you try to cut it. When it’s ready, just cut it into squares and get ready for some serious compliments!
Preparing the Flavored Gelatin Cubes
Getting those vibrant, jiggly cubes just right is step one! After you’ve bloomed your first unflavored gelatin and dissolved it in hot water, you’re going to divide that clear liquid into four bowls. Then, simply whisk in each of your flavored gelatin packets until they’re completely dissolved. Pour them into shallow dishes – a pie plate or an 8×8 baking dish works great for each color. The shallower the better, as it helps them set faster and makes cutting into neat 1/2-inch cubes so much easier. Pop them into the fridge for at least 4 hours, or until they’re super firm. Don’t rush this part; perfectly set cubes mean a beautiful mosaic!
Crafting the Creamy Rompope Base
Now for the star of the show: that dreamy rompope base! You’ll bloom your two packages of unflavored gelatin in cold water in a small saucepan. Then, gently heat it over low heat, stirring constantly until it’s totally dissolved and clear. Remember, no boiling! Once it’s clear, take it off the heat and let it cool down a bit – just a few minutes, so it’s not piping hot when it meets the milk. In a separate, larger bowl, whisk together the evaporated milk, sweetened condensed milk, rompope, and vanilla. Once that gelatin has cooled slightly, slowly, slowly pour it into your milk mixture while whisking constantly. This slow addition and constant whisking are key to getting a perfectly smooth, uncurdled base. You want it silky and well-combined.
Assembling and Setting Your Mosaic Gelatin with Rompope
This is where your Mosaic Gelatin with Rompope truly comes to life! Once your flavored gelatin cubes are firm and cut, arrange them evenly in your lightly greased 9×13 inch baking dish. Try to spread out the colors so they look pretty. Then, carefully pour that creamy rompope mixture over all the cubes. You might need to gently push some cubes down with a spoon to make sure they’re fully submerged and distributed throughout the liquid. Once it’s all poured, back into the fridge it goes! This final chill needs at least 6 hours, but honestly, overnight is best. You’ll know it’s fully set when it feels firm to the touch and doesn’t jiggle too much when you gently shake the pan. Patience, my friend, patience!
Tips for Perfect Mosaic Gelatin with Rompope
Making this Mosaic Gelatin with Rompope is pretty straightforward, but a few little tricks can take it from good to absolutely amazing. First off, don’t rush the chilling times! Gelatin needs its beauty sleep to set up properly. Also, when you’re cutting those colored cubes, a lightly oiled knife can make a huge difference in getting clean cuts. And speaking of cutting, try to make your cubes roughly the same size – it makes for a prettier mosaic. For an extra touch, you can lightly dust the finished dessert with powdered sugar right before serving, or even add a few fresh berries on top for a pop of color!
Ensuring Your Mosaic Gelatin with Rompope Sets Firmly
The number one rule for gelatin success? Chill, baby, chill! Make sure your fridge is good and cold, and give your Mosaic Gelatin with Rompope plenty of time to set – at least 6 hours, but overnight is really the sweet spot. Also, double-check that both your unflavored gelatin for the cubes and the rompope base are fully dissolved. Any undissolved bits mean it won’t set right. And remember to let the dissolved gelatin for the rompope base cool slightly before mixing it with the milk; too hot, and it can weaken the setting power.
Common Questions About Mosaic Gelatin with Rompope
Got a few questions bubbling up about making your own Mosaic Gelatin with Rompope? Don’t worry, you’re not alone! I get asked these all the time, and I’m happy to share my tips and tricks to make sure your dessert is a total success. Whether you’re thinking about changing flavors, wondering how to store it, or just trying to figure out why it didn’t set, I’ve got your back. Let’s tackle these common queries together so you can make the best colorful gelatin dessert possible!
Can I Use Different Flavors for My Mosaic Gelatin with Rompope?
Absolutely, you totally can! This is where you can really get creative with your Mosaic Gelatin with Rompope. While I love the classic lime, cherry, orange, and grape, feel free to swap them out for your favorites. Strawberry, blue raspberry, or even a lemon gelatin would be delicious! Just make sure the flavors complement each other and the rompope base. Think about what goes well with a creamy, rich custard flavor, and you’ll be golden!
How to Store Leftover Mosaic Gelatin with Rompope?
Storing your beautiful Mosaic Gelatin with Rompope is super easy. Just cover the baking dish tightly with plastic wrap or aluminum foil and keep it in the refrigerator. It’ll stay fresh and delicious for about 3-4 days. The good news is, gelatin desserts actually taste even better the next day once all those flavors have had a chance to meld together. So, making it ahead of time is definitely a bonus!
Why Did My Mosaic Gelatin with Rompope Not Set?
Oh no, the dreaded non-set! This usually happens for a few reasons. First, did you make sure your unflavored gelatin was fully dissolved? Any granules left means it won’t set properly. Second, was your hot water hot enough to dissolve it? And for the rompope base, did you let the dissolved gelatin cool slightly before adding it to the milk mixture? If it’s too hot, it can sometimes mess with the milk and prevent it from setting. Always give it plenty of chilling time too – at least 6 hours, or preferably overnight!
Estimated Nutritional Information for Mosaic Gelatin with Rompope
Just a quick heads-up about the nutritional info for this Mosaic Gelatin with Rompope! Please keep in mind that any values you see are just estimates. Things like the specific brands of gelatin, rompope, and milk you use can totally change the numbers. So, think of it as a general idea rather than a precise count!
Your Turn to Create Mosaic Gelatin with Rompope
Okay, now it’s YOUR turn! I’ve shared all my secrets for this amazing Mosaic Gelatin with Rompope, and I really, really want you to try it. Seriously, gather your ingredients, put on some fun music, and get jiggly with it! Once you’ve made it, come back here and tell me all about it in the comments. Did you love it? Did you try a new flavor combo? Your feedback means the world to me, and it helps other home cooks too! Happy jiggling!
Print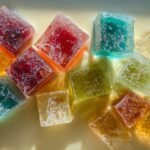
Mosaic Gelatin with Rompope: A 1-of-a-kind sweet dream!
- Total Time: 10 hours 55 minutes
- Yield: 12 servings 1x
- Diet: Vegetarian
Description
A festive and colorful gelatin dessert featuring cubes of flavored gelatin suspended in a creamy rompope (Mexican eggnog) gelatin base.
Ingredients
- 1 (7 gram) package unflavored gelatin
- 1/2 cup cold water
- 1 1/2 cups hot water
- 1 (3 ounce) package lime flavored gelatin
- 1 (3 ounce) package cherry flavored gelatin
- 1 (3 ounce) package orange flavored gelatin
- 1 (3 ounce) package grape flavored gelatin
- 2 (7 gram) packages unflavored gelatin
- 1 (12 fluid ounce) can evaporated milk
- 1 (14 ounce) can sweetened condensed milk
- 1 cup rompope (Mexican eggnog)
- 1 teaspoon vanilla extract
Instructions
- Lightly grease a 9×13 inch baking dish.
- In a medium bowl, sprinkle 1 (7 gram) package unflavored gelatin over 1/2 cup cold water. Let stand for 5 minutes to soften.
- Add 1 1/2 cups hot water to the softened gelatin and stir until completely dissolved.
- Divide the dissolved gelatin mixture evenly among four separate bowls.
- In each bowl, dissolve one package of flavored gelatin (lime, cherry, orange, grape) into the gelatin mixture, stirring until fully dissolved.
- Pour each colored gelatin mixture into separate shallow dishes or small baking pans.
- Refrigerate for at least 4 hours, or until firm.
- Once firm, cut each colored gelatin into 1/2-inch cubes. Gently mix the different colored cubes together and arrange them evenly in the prepared 9×13 inch baking dish.
- In a small saucepan, sprinkle 2 (7 gram) packages unflavored gelatin over 1/2 cup cold water. Let stand for 5 minutes to soften.
- Heat the gelatin mixture over low heat, stirring constantly, until the gelatin is completely dissolved. Do not boil. Remove from heat and let cool slightly.
- In a large bowl, whisk together evaporated milk, sweetened condensed milk, rompope, and vanilla extract.
- Slowly pour the slightly cooled dissolved gelatin into the milk mixture, whisking constantly to combine thoroughly.
- Carefully pour the rompope mixture over the colored gelatin cubes in the baking dish, ensuring the cubes are evenly coated and suspended.
- Refrigerate for at least 6 hours, or preferably overnight, until the gelatin is completely set.
- To serve, cut into squares and enjoy.
Notes
- For easier cutting, lightly spray the molds or dishes with cooking spray before adding the gelatin.
- Ensure the unflavored gelatin for the rompope mixture is not too hot when added to the milk, as it can curdle the milk.
- This dessert is best made a day in advance to allow for proper setting.
- Prep Time: 45 minutes
- Cook Time: 10 minutes
- Category: Dessert
- Method: No Bake
- Cuisine: Mexican
Nutrition
- Serving Size: 1 square
- Calories: 350
- Sugar: 45g
- Sodium: 120mg
- Fat: 8g
- Saturated Fat: 5g
- Unsaturated Fat: 2g
- Trans Fat: 0g
- Carbohydrates: 60g
- Fiber: 0g
- Protein: 10g
- Cholesterol: 25mg
Keywords: mosaic gelatin, rompope, Mexican dessert, gelatin, colorful dessert, no-bake dessert